Sunday, April 3, 2022

Migration To GitHub Pages

This website has been long overdue for an upgrade and after some searching around I've finally found a new home for the blog that I think will suit it better. New blog will be at https://tekwizz123.github.io. Some older blog posts on privacy and other entries will not be ported over, mostly because they were either filler posts I made that contain little useful information, or because they contain information that has long since gone out of date and is no longer relevant (this mainly affects some of the older privacy posts that I did). Rest assured that most of the posts will still remain however, Blogger is just a real pain when it comes to their custom data format which should hopefully be solved with this migration as now I can write my blogs in MarkDown which should be a lot easier since I do a lot of MarkDown work for my job, and it should also make any future migrations easier to perform.

The site will now be based around Beautiful Jekyll from https://beautifuljekyll.com/, GitHub Pages, and Discus. Unfortunately I will not be able to migrate the comments over, so some context may be lost there. All content will still be the same and I have also been working hard to fix up wording for some of the articles and fix typos etc to make the reading and viewing experience a lot more pleasant. May take a few more days but most material has already been moved over.

This site will be deleted soon though, and I'll likely leave this post up for a bit until people can convert their links and references over to the new website. Hopefully shouldn't interrupt too many things though there is always the Internet Archive if you need a backup of anything.

Until then, good luck and keep hacking :)

Monday, December 10, 2018

Practical Reverse Engineering - Chapter 1 pg 35 - Exercise #5 - KeInitializeDPC and KeInitializeThreadedDpc

Question: Decompile the following kernel routines in Windows:
  • KeInitializeDpc

KeInitializeDpc
So for starters lets see if there is any MSDN documentation on this function. Looking things up we see this link: https://docs.microsoft.com/en-us/windows-hardware/drivers/ddi/content/wdm/nf-wdm-keinitializedpc
So from this we can tell the function header should be the following:
NTKERNELAPI VOID KeInitializeDpc(
    PRKDPC Dpc,
    PKDEFERRED_ROUTINE DeferredRoutine,
    PVOID DeferredContext
);
The corresponding disassembly of this function can be seen below:
; void __stdcall KeInitializeDpc(PRKDPC Dpc, PKDEFERRED_ROUTINE DeferredRoutine, PVOID DeferredContext)
public KeInitializeDpc
KeInitializeDpc proc near
xor     eax, eax
mov     dword ptr [rcx], 113h
mov     [rcx+38h], rax
mov     [rcx+10h], rax
mov     [rcx+18h], rdx
mov     [rcx+20h], r8
retn
KeInitializeDpc endp
Looking at the definition of this function, we immediately notice that RCX appears to be some sort of structure that is getting filled out. According to x64 documentation, the first argument is passed in RCX, the second in RDX, the third in R8 and the fourth in R9. This would mean that RCX corresponds to PRKDPC Dpc.

But what is PRKDPC? If we refer back again to https://docs.microsoft.com/en-us/windows-hardware/drivers/ddi/content/wdm/nf-wdm-keinitializedpc, we can see this is a pointer to a KDPC object. Using the magic of WinDBG, we can dump the outline of this structure, even though its supposed to be an opaque structure (aka "we may change this structure so don't rely on the details of it remaining the same"), using the dt command. Specifically, dt nt!_KDPC will give us the details we need:
0:010> dt nt!_KDPC
ntdll!_KDPC
   +0x000 TargetInfoAsUlong : Uint4B
   +0x000 Type             : UChar
   +0x001 Importance       : UChar
   +0x002 Number           : Uint2B
   +0x008 DpcListEntry     : _SINGLE_LIST_ENTRY
   +0x010 ProcessorHistory : Uint8B
   +0x018 DeferredRoutine  : Ptr64     void 
   +0x020 DeferredContext  : Ptr64 Void
   +0x028 SystemArgument1  : Ptr64 Void
   +0x030 SystemArgument2  : Ptr64 Void
   +0x038 DpcData          : Ptr64 Void
Ok so now that we know what offsets correspond to different parts of the KDPC object, we can translate the x64 assembly code into the following C code:
NTKERNELAPI VOID KeInitializeDpc(PRKDPC Dpc, PKDEFERRED_ROUTINE DeferredRoutine, PVOID DeferredContext){
  PRKDPC->TargetInfoAsUlong = 0x113;
  PRKDPC->DpcData = NULL;
  PRKDPC->ProcessorHistory = 0;
  PRKDPC->DeferredRoutine = DeferredRoutine;
  PRKDPC->DeferredContext = DeferredContext;
}
If we check this against the HexRays disassembly we can see this is pretty much the same output:
void __stdcall KeInitializeDpc(PRKDPC Dpc, PKDEFERRED_ROUTINE DeferredRoutine, PVOID DeferredContext)
{
  Dpc->TargetInfoAsUlong = 275;
  Dpc->DpcData = 0i64;
  Dpc->ProcessorHistory = 0i64;
  Dpc->DeferredRoutine = (void (__fastcall *)(_KDPC *, void *, void *, void *))DeferredRoutine;
  Dpc->DeferredContext = DeferredContext;
}
So now that is out of the way, the question remains why TargetInfoAsUlong is specifically set to a value of 0x113. Referring back to the WinDBG dump, we can see that TargetInfoAsUlong is actually a structure that contains a one byte Type field, a one byte Importance field, and a two byte Number field.

Therefore setting the value of TargetInfoAsUlong to 0x113 actually sets Type to 0x13, Importance to 0x1 and Number to 0x0. To get a better idea of the KDPC structure I tried referring to ReactOS, specifically https://doxygen.reactos.org/d9/d82/struct__KDPC.html, however there is no documentation there on any of the fields, just the KDPC structure itself.

So with ReactOS out of the way I ended up turning to Geoff Chappel's website, which has a TON of really cool blog posts on research he has done into the Windows kernel. Specifically he has a brilliant article on KDPC available at https://www.geoffchappell.com/studies/windows/km/ntoskrnl/api/ke/dpcobj/kdpc.htm. From here we can learn that the value of the Importance field is actually MediumImportance, which is the default value for a KDPC object unless it is changed via KeSetImportanceDpc.

This is kind of ironic as if we look at the code for KeSetImportanceDpc we will see what has to be the world's simplest kernel function:
public KeSetImportanceDpc
KeSetImportanceDpc proc near
mov     [rcx+1], dl
retn
KeSetImportanceDpc endp
Which makes sense as this is essentially just taking in a a KDPC object along with a byte value as arguments, and is then setting the Importance flag of the KDPC object to the byte value specified.

If we now turn our attention to the Type field we can see that Geoff Chappel notes that this field is DpcObject for a normal DPC or ThreadedDpcObject for a threaded DPC. Looking up DpcObject brings us to https://www.geoffchappell.com/studies/windows/km/ntoskrnl/structs/kobjects.htm which shows that on Windows kernel versions later than 3.51 (aka any modern OS), the value for DpcObject is 0x13.

For those interested, according to Geoff Chappel ThreadedDpcObject is apparently 0x1A on NT 6.3 and later (aka Windows 8.1 and later), however its value from NT 5.2 to 6.2 (Windows XP to Windows 8) was 0x18). This can be confirmed if I decompile the function KeInitializeThreadedDpc on a Windows 10 build:
KeInitializeThreadedDpc proc near
xor     eax, eax
mov     dword ptr [rcx], 11Ah
mov     [rcx+38h], rax
mov     [rcx+10h], rax
mov     [rcx+18h], rdx
mov     [rcx+20h], r8
retn
KeInitializeThreadedDpc endp
Again this is pretty much the same code as before, the only difference is that this time the Type value is being set 0x1A, or ThreadedDpcObject. Otherwise the code is exactly the same as KeInitializeDpc.

Finally Geoff Chappel notes that the Number field denotes the importance or the processor on which this DPC will be run. I assume given that this is set to 0 that the idea is its either being either set to its initial priority or its being set to run on processor 0. With this knowledge we can create a better decompiled version of both KeInitializeDpc and KeInitializeThreadedDpc:
void __stdcall KeInitializeDpc(PRKDPC Dpc, PKDEFERRED_ROUTINE DeferredRoutine, PVOID DeferredContext)
{
  PRKDPC->Type = DpcObject;
  PRKDPC->Importance = MediumImportance;
  PRKDPC->Number = 0;
  PRKDPC->DpcData = NULL;
  PRKDPC->ProcessorHistory = 0;
  PRKDPC->DeferredRoutine = DeferredRoutine;
  PRKDPC->DeferredContext = DeferredContext;
}

void __stdcall KeInitializeThreadedDpc(PRKDPC Dpc, PKDEFERRED_ROUTINE DeferredRoutine, PVOID DeferredContext)
{
  PRKDPC->Type = ThreadedDpcObject;
  PRKDPC->Importance = MediumImportance;
  PRKDPC->Number = 0;
  PRKDPC->DpcData = NULL;
  PRKDPC->ProcessorHistory = 0;
  PRKDPC->DeferredRoutine = DeferredRoutine;
  PRKDPC->DeferredContext = DeferredContext;
}
Hope you enjoyed this walkthrough. If you have any questions, comments, or otherwise feel free to drop them down below. I'm still very new to Windows kernel reversing so its quite possible I've stuffed something up, though I'm open to suggestions and improvements so please do send them my way.

More kernel function reversing entries will be coming soon, although they may be separate entries as some of these are a bit longer than I originally expected with the extra background research I'm doing for them.

Thursday, December 6, 2018

Practical Reverse Engineering - Chapter 1 pg 35 - Exercise #4

Question: Implement the following functions in x86 assembly: strlen, strchr, memcpy, memset, strcmp, strset.

strlen
push ebp
mov ebp, esp
push edi; Save nonvolatile register.
push esi; Save nonvolatile register.
mov edi, [ebp+0x8]; Set ESI to the first argument passed in 
                  ; aka the pointer to the string.
mov esi, edi; Save original starting point of the string into ESI.
xor al, al; Set AL or the byte being searched for, 
          ; to 0, or a NULL byte.
repne scasb; Keep incrementing EDI and comparing it to see 
           ; if it is a NULL byte. Stop loop when a NULL 
           ; byte is hit.
sub edi, esi; EDI will contain the address of a NULL byte. Subtract
            ; this address by ESI or the address of the start of the
            ; string to find the number of bytes read aka the string 
            ; length and save this number in EDI.
mov eax, edi; Return EDI or the string length.
pop esi; Restore original ESI value.
pop edi; Restore original EDI value.
mov esp, ebp; Restore ESP value
pop ebp; Restore frame pointer value
ret; Return

strchr
push ebp
mov ebp, esp; Save ESP value for later restoration. Part of function prologue.
push ebx ; EBX is not a volatile register, so save it onto 
         ; the stack for later restoration. EAX, ECX, and 
         ; EDX are volatile (https://en.wikibooks.org/wiki/X86_Assembly/High-Level_Languages#STDCALL)
mov edx, [ebp+0xC] ; Set EDX to the value of the second 
                   ; argument aka int character
mov ebx, [ebp+0x8] ; Set EBX to the value of the first
                   ; argument aka char * str
check_null:
    mov ecx, byte ptr [ebx]; Perform a memory read to get the value
                           ; of the current byte in the string.
                           ; Doing this at the top of the loop saves
                           ; us having to do extra memory reads.
    cmp ecx, 0 ; Check that we haven't reached the end of the 
               ; string aka the NULL byte.
    mov  eax, 0 ; Prepare to return 0, aka a 
                ; NULL pointer, as the result.
    jz finish ; Jump to finish if the current byte in the string 
              ; is NULL, aka we hit the end of the string.
check_equal:
    cmp ecx, edx ; Check if current character in string
                 ; is the one being searched for.
    mov eax, ebx ; Set EAX to the location where the character was
                 ; found to set return value correctly.
    jz finish ; Jump to finish if the current byte in the
              ; string is the one being searched for.
loop_jump:
    inc ebx ; Increment EBX to point to the 
            ; next character in the string
    jmp check_null ; Jump back to the top of the loop to
                   ; continue searching through the string.
finish:
    pop ebx ; Restore EBX back to its original value.
    mov esp, ebp ; Restore ESP back to its original value.
    pop ebp ; Set EBP or the frame pointer, back to its previous value.
    ret ; Return

memcpy
push ebp
mov ebp, esp ; Function prologue
push esi ; Save original ESI value, nonvolatile register.
push edi ; Save original EDI value, nonvolatile register.
mov ecx, [ebp+0x10] ; Set ECX to size or the number of bytes to copy over.
mov esi, [ebp+0xC] ; Set ESI to the value of the source argument.
mov edi, [ebp+0x8] ; Set EDI to the value of the destination argument.
cld ; Thanks to zerosum0x0 for pointing out in his articles that 
    ; this needs to be done. Otherwise we can't be sure that EDI 
    ; and ESI will be incremented when doing movsb operation.
rep movsb ; Move ECX number of bytes from ESI, or source to 
          ; EDI, or destination, incrementing EDI and ESI
          ; with each byte read.
mov eax, [ebp+0x8] ; Set EAX, or the return value, to destination.
pop edi ; Restore original EDI value.
pop esi ; Restore original ESI value.
mov esp, ebp
pop ebp ; Function epilogue
ret

memset
push ebp
mov ebp, esp ; Function prologue
push edi ; Save value of EDI register, nonvolatile register.
mov ecx, [ebp+0x10] ; Set ECX to the argument num 
                    ; or number of bytes to set.
mov eax, [ebp+0xC] ; Set EAX to the argument value or 
                   ; the value to set the bytes to.
mov edi, [ebp+0x8] ; Set EDI to the argument ptr or the 
                   ; address of the block of memory to fill.
cld ; Set the direction flag to 0 to ensure EDI is incremented
    ; every time the stosb instruction is executed.
rep stosb ; Fill ECX bytes of memory with the value in EAX,
          ; starting at the address in EDI. EDI will be 
          ; incremented each time the stosb instruction is executed.
mov eax, [ebp+0x8] ; Set the return value to the start of the
                   ; block of memory that was filled out.
pop edi ; Set EDI back to its original value.
mov esp ebp
pop ebp ; Function epilogue
ret;

strset
push ebp ; Save previous frame pointer onto the stack.
mov ebp, esp ; Set EBP to point to the current frame pointer.
mov eax, [ebp+0xC] ; Set EAX to the argument int c
mov ecx, [ebp+0x8]; Set ECX to the argument char * str
loop_start:
   cmp byte ptr [ecx], 0 ; Check if the current byte of the 
                         ; string being processed is NULL.
   jz finish ; Jump to the finish if it is.
   mov byte ptr [ecx], al ; Set the current byte in the string
                          ; to the value of the argument c.
   inc ecx ; Set ECX to point to the next byte in the string.
   jmp loop_start ; Jump back to the start of the loop.
finish:
  mov eax, [ebp+8] ; Set the return value to the address of 
                   ; the first byte of the string that was set.
  mov esp, ebp ; Restore previous ESP value
  pop ebp ; Restore previous stack frame value.
  ret

strcmp
push ebp
mov ebp, esp ; Function prologue code
push edi ; Save EDI value, nonvolatile register.
push esi ; Save ESI value, nonvolatile register.
mov edx, [ebp+0xC] ; Set EDX to str2
mov ecx, [ebp+0x8] ; Set ECX to str1
dec edx ; Subtract EDX by 1 since the later loop_start code will be 
        ; incrementing it by 1 for each iteration of the loop.
dec ecx ; Subtract ECX by 1 since the later loop_start code will be 
        ; incrementing it by 1 for each iteration of the loop.
loop_start:
    inc edx ; Increment EDX to point to the next byte in the str2 string.
    inc ecx ; Increment ECX to point to the next byte in the str1 string.
    mov edi, byte ptr [edx] ; Set EDI to current byte in str2 being processed.
    mov esi, byte ptr [ecx] ; Set ECX to current byte in str1 being processed.
    cmp esi, edi ; Compare current byte in str1 to current byte in str2.
    jl lower_str1 ; If the value of the current byte being processed 
                  ; in str1 is lower than the value of the current 
                  ; byte being processed in str2, then jump to lower_str1.
    jg greater_str1 ; If the value of the current byte being processed 
                  ; in str1 is greater than the value of the current 
                  ; byte being processed in str2, then jump to greater_str1.
    jmp compare_null ; If the current byte being processed in str1 is 
                     ; equal to the current byte being processed in str2,
                     ; then jump to compare_null to see if we the byte 
                     ; that was compared is a NULL byte aka we have 
                     ; reached the end of both strings.
lower_str1:
    mov eax, -1 ; If the first character that does not match has a lower
                ; value in str1 than str2, return a value < 0. The value
                ; -1 will work for our purposes.
    jmp finish ; Jump to cleanup code.
greater_str1:
    mov eax, 1 ; If the first character that does not match has a 
               ; greater value in str1 than str2, return a value
               ; > 0. The value 1 will work for our purposes.
    jmp finish ; Jump to cleanup code.
compare_null:
    test edi, edi ; Check that the bytes being currently being processed 
                  ; in str1 and str2, which have been determined to be 
                  ; the same as one another, are not NULL bytes.
    jnz loop_start ; If the bytes that were matched are not NULL 
                   ; bytes, continue the processing loop.
    mov eax, 0 ; Otherwise if they are both NULL bytes, set the
               ; return value to 0 to indicate the two strings 
               ; are the same as one another.
finish:
    pop esi ; Restore the original value of ESI.
    pop edi ; Restore the original value of EDI.
    mov esp, ebp
    pop ebp ; Function epilogue code
    ret

Wednesday, November 21, 2018

Practical Reverse Engineering - Chapter 1 pg 35 - Exercise #3

Question: In some of the assembly listings, the function name has a @ prefix followed by a number. Explain when and why this decoration exists.


So first off I should clarify that technically the @ symbol isn't a prefix as described in the book but is rather a suffix which is part of the function's name. With that out of the way, I did some digging into the way this is used. An example of a function within the assembly listings referenced by this question was _DllMain@12. According to https://en.wikipedia.org/wiki/Name_mangling, this is a common way to perform name mangling on functions (all the following information is taken from this page so please refer to it if you wish to gain a more complete understanding. I'm just simplifying what they say and adding some examples).

So what exactly is name mangling? Simply put, when compiling a program the linker needs to know what functions are being used or declared by a program, their calling convention, and the size and types of the respective parameters. Additionally if any functions are overloaded (aka multiple declarations of the same function but with different signatures (ex making two declarations such as int aFunc(b) and int aFunc(b,c). Both have the same function name but different signatures as the expected parameters are different), or two functions with the same name but different namespaces (internalFunc::theFunc(a,b) and externalFunc::theFunc(a,b) would be an example), then mangling needs to occur.

In C the convention is as follows:
  • If the calling convention is CDECL, append _ before the function name.
  • If the calling convention is STDCALL, append _ before the function name. Then append @ after the function name, followed by the total number of bytes that all the parameters take up.
  • If the calling convention is FASTCALL, then add @ before the function name. Then append @ after the function name, followed by the total number of bytes that all the parameters take up.
If you think about it this makes sense though. In CDECL, the caller is responsible for cleaning up the stack, so there is no need for the linker to really care about how many bytes are used in the callee, this is handled by the caller. In the case of STDCALL and FASTCALL though, the linker needs to be aware of how many bytes these functions use for their arguments so that it can generate code that appropriately cleans up the stack for these functions.

So from this we can break down the definition of _DllMain@12. Since it starts with _ and ends with @ followed by a number, it is a STDCALL function. Additionally based on the fact that it follows the conventions mentioned above we can also conclude it is a C function and not a C++ function (which will we show shortly). The DllMain part tells the linker that the function name is DllMain whist the @12 part tells the linker to reserve 12 bytes on the stack for the arguments. This makes sense since DllMain has the definition DllMain(HINSTANCE hinstDLL, DWORD fdwReason, LPVOID lpReserved), which means each argument takes 4 bytes each. 4 * 3 arguments gives us the 12 bytes mentioned in the mangled function definition.

Interestingly according to the Wikipedia page mentioned earlier, unlike C there appears to be no clear mangling method for C++ functions. For example the Borland compiler has one way of mangling function names whilst the Microsoft MSVC compiler has a very different way of mangling names (refer to https://en.wikipedia.org/wiki/Name_mangling for some examples).

Perhaps the best tutorial I've seen on actually demangling C++ names by hand was this tutorial though: http://www.int0x80.gr/papers/name_mangling.pdf. Worth a read if you have the time.

Also interesting note that was mentioned in the http://www.int0x80.gr/papers/name_mangling.pdf paper but if your using IDA you can change the way IDA displays mangled symbols by choosing Options->Demangled Names.... and then clicking on the option buttons to either set the demangled name as a comment, not demangle names at all, or change the function name to the demangled version. Should help if you want to clean things up a bit in your view.

Tuesday, November 20, 2018

Practical Reverse Engineering - Chapter 1 pg 35 - Exercise #2

Question: In the example walkthrough, we did a nearly one-to-one translation of the assembly code to C. As an exercise, re-decompile this whole function so that it looks more natural. What can you say about the developer's skill level/experience? Explain your reasons. Can you do a better job?

My version of the original code after decompilation by hand into Visual Studio:
#include "stdafx.h"
#include <intrin .h="">
#include <tlhelp32 .h="">

typedef struct _IDTR {
    DWORD base;
    SHORT limit;
} IDTR, *PIDTR;

BOOL _stdcall DllMain(HINSTANCE hinstDLL, DWORD fdwReason, LPVOID lpvReserved) {
    IDTR idtr;
    tagPROCESSENTRY32 processEntry;
    HANDLE snapshot;
    __sidt(&idtr);
    if ((idtr.base > 0x8003F400) && (idtr.base < 0x80047400)) {
        return FALSE;
    }
    memset(&processEntry, 0, 0x128);
    snapshot = CreateToolhelp32Snapshot(TH32CS_SNAPPROCESS, 0);
    if (snapshot == INVALID_HANDLE_VALUE) {
        return FALSE;
    }
    processEntry.dwSize = 0x128;
    if (Process32First(snapshot, &processEntry) == 0) {
        return FALSE;
    }
    while (strcmp(processEntry.szExeFile, "explorer.exe") == 0) {
        Process32Next(snapshot, &processEntry);
    }
    if (processEntry.th32ParentProcessID == processEntry.th32ProcessID) {
        return FALSE;
    }
    if (fdwReason == DLL_PROCESS_ATTACH) {
        CreateThread(NULL, 0, (LPTHREAD_START_ROUTINE)0x100032D0, NULL, 0, NULL);
    }
    return TRUE;
}
Based off of the number of checks that are occurring here I would say the developer seems to be aware of the limitations of some Windows functions and what needs to be checked before continuing. Therefore I would say that they have a good level of experience with the Win32 API. My guess based on https://www.slideshare.net/MattiaSalvi2/virtual-machines-security-internals-detection-and-exploitation is that the attackers were trying to identify if the machine is potentially being virtualized so that they could prevent exploitation if such scenarios where encountered, however as described in the book this is a really bad way of doing things as it assumes that the code is running on core 0.

Since each core/processor has its own individual IDT table, if this code was run on a secondary core or processor (aka not processor 0/core 0) then the IDT register value would not be the same as the values the attacker is expecting in this code. Similarly later versions of Windows also change the IDT base address across boots so this adds even less reliability to the technique utilized by the malware. These two points are noted on page 31 where the authors state "Clearly 0x8003F400 is only valid for core 0 on Windows XP. If the instruction were to be scheduled to run on another core, the IDTR would be 0xBAB3C590. On later versions of Windows, the IDT base address changes between reboots; hence the practice of hardcoding base addresses will not work".

As for if one could improve this, I did some research into things and found this paper: https://www.slideshare.net/MattiaSalvi2/virtual-machines-security-internals-detection-and-exploitation by Matta Salvi which mentions something quite similar to what the code in this example was trying to achieve (ironically though VM detection code actually performs the opposite of what the code in the malware is doing. My guess is some old VM software versions may have been acting as virtual Windows XP machines back in the day, hence why malware may try check the IDT base address) as well as a project called Scoopy.

Looking this up links to ScoopyNG located at http://www.trapkit.de/tools/scoopyng/ which is a project containing a number of Anti-Virtualization tricks that can be used to detect virtualization. Testing these out most of the techniques didn't work anymore (VMWare and VirtualBox have both gotten smarter about detecting Anti-VM techniques, or at least the well known ones), however there were a few VMWare specific techniques that still worked on a recent version of VMWare Workstation when I tested it out. Keep in mind ScoopyNG project is from 2008 though so I'm sure there are a lot better techniques and mitigations out there today (10 years does change a lot of things technology wise).

On the results of testing ScoopyNG on recent versions of VMWare and VirtualBox, I'd imagine this code could be improved to not only use more specific techniques to determine if they are in a virtual machine (and hence stop exploitation if so), but also something like GetVersionEx to help determine what version of the operating system they are running on if they wanted to target a specific range of operating systems (provided they were targeting OS versions prior to Windows 8.1). This would also get around the limitation of the IDT technique used as regardless of which core the GetVersionEx function is run on, valid OS version information should still be returned.

On a side note though I'd be interested to know if anyone has a better method for detecting VMs that still works these days. The RedPill method that Joanna Rutkowska (http://www.securiteam.com/securityreviews/6Z00H20BQS.html) published has long since been mitigated and most of the other techniques seem to be specific to the VM software being utilized. Therefore I'm curious if VM detection strategies nowadays have migrated to performing platform specific attacks (like the checks that SnoopyNG did to successfully detect it was running in VMWare Workstation during my tests) or if there are still ways to do things generically (all the generic test in VirtualBox failed and SnoopyNG didn't have any VirtualBox specific tests so it thought it was running in a native machine).

Monday, November 12, 2018

Practical Reverse Engineering - Chapter 1 pg 25 - Author's Challenge Solution

Question: Take the example shown on page 24 and decompile it further to make it look more "natural"


Solution:

char * sub_1000AE3B(char * aStr){
    signed int length = lstrlenA(aStr);
    signed int counter1 = 0;
    signed int counter2 = 0;
    if(length != 0){
        while(counter2 < length){
            aStr[counter1] = aStr[counter2];
            counter2 += 3;
            counter1 += 1;
        }
    }
    aStr[counter1] = '\x00';
    return aStr;
}

Additional Notes

The disassembly on page 25 of the edition I am reading is incorrect. In the example given the authors provide an example whose assembly is as follows:
01 mov ecx, edx
02 loc_CFB8F:
03     lodsd
04     not eax
05     stosd
06     loop loc_CFB8F
They then state that this is the corresponding disassembly to C:
while (ecx != 0) {
     eax = *edi
     edi++;
     *esi = ~eax;
      esi++;
      ecx--;
}
If one refers back to their earlier remarks about how lodsd works, one will see that this command actually loads into EAX the DWORD at the location pointed to by ESI (refer to http://faydoc.tripod.com/cpu/lodsd.htm or the x86 instruction manual by Intel if you need further confirmation). Similarly, stosd actually stores the value at EAX into EDI, not ESI as shown above (see http://faydoc.tripod.com/cpu/stosd.htm).

Therefore the rough C code should actually be:
while (ecx != 0) {
     eax = *esi
     esi++;
     *edi = ~eax;
      edi++;
      ecx--;
}
Aka a simple switch of the ESI and EDI registers in the example C code provided.

Thursday, November 9, 2017

Practical Reverse Engineering - Chapter 1 pg 17 Exercise

Question 1


Question: Given what you learned about CALL and RET, explain how you would read the value of EIP? Why can't you just do MOV EAX, EIP?

Answer: The easiest way I could think of to read the current value of EIP was to do the following:

CALL *instruction after this call instruction* <- 5 Bytes
POP EAX <- 1 Byte (the instruction that we will point to)
ADD EAX, 4 <- 3 bytes

Essentially we will do a CALL to the POP EAX instruction, at which point ESP will point to the address where "POP EAX" is located in memory (aka the return address for the CALL instruction). POP EAX will ensure EAX gets set to this value. Adding 4 to EAX will ensure we add 1 to this value to compensate for the "POP EAX" instruction, then we add another 3 for the bytes that formulate the "ADD EAX, 4" instruction.

And there we go, we have EIP :)

To answer the other question we can refer to page 82 of https://software.intel.com/sites/default/files/managed/39/c5/325462-sdm-vol-1-2abcd-3abcd.pdf or section 3.5 of volume 1 of the Intel Software Developer's Manual. On this page they mention that EIP can only be controlled by control transfer instructions like CALL, JMP, etc. It cannot be directly accessed by software in x86.

Question 2


Question: Come up with at least two code sequences to set EIP to 0xAABBCCDD.

Answer:

Option 1
PUSH 0xAABBCCDD ; PUSH value onto the stack
RETN ; POP the value at the top of the stack into EIP and resume execution from this location.

Option 2
JMP 0xAABBCCDD ; Just straight up redirect execution. Why not make it simple after all?

Option 3
CALL 0xAABBCCDD ; Another option :)

Option 4 - Aka the fancier conditional option
XOR EAX, EAX ; Set EAX to zero
TEST EAX, EAX ; Check if EAX is 0
JZ 0xAABBCCDD ; Jump to 0xAABBCCDD if so.

Question 3


Question: In the example function, addme, what would happen if the stack pointer were not properly restored before executing RET?

Answer: Well considering the stack pointer would be the part where we do the PUSH EBP instruction, we would return execution to EBP, which means we would return execution to the base pointer of the function that called the addme() function. Since this base pointer will be an address on the stack, this will result in the program trying to execute data off of the stack itself as though it was code. What happens from here depends on the data that is on the stack, but most likely some invalid instructions would be executed and the program would crash. This is assuming the stack is executable as on modern systems the more likely scenario is that DEP would kick in and you would get an ACCESS VIOLATION as the stack would be marked as non-executable.

Question 4


Question: In all of the calling conventions explained the return value is stored in a 32-bit register (EAX). What happens when the return value does not fit in a 32-bit register? Write a program to experiment and evaluate your answer. Does the mechanism change from compiler to compiler?

Answer: So the answer to this, according to my testing it depends how the program is written. For a test I wrote the following program:
#include <stdio.h>
#include <stdlib.h>
int main(int argc, char *argv[]) {
 long long num = 0x8888888822223344;
 return num;
}
The output of this when compiled with Dev C++ 5.11 with the TDM-GCC 4.9.2 32 Bit Release option and then decompiled with IDA Pro was as follows:
; int __cdecl main(int argc, const char **argv, const char **envp)
public _main
_main proc near

argc= dword ptr 8
argv= dword ptr 0Ch
envp= dword ptr 10h

push ebp
mov ebp, esp
and esp, 0FFFFFFF0h
sub esp, 10h
call ___main
mov dword ptr [esp+8], 22223344h
mov dword ptr [esp+0Ch], 88888888h
mov eax, [esp+8]
leave
retn
_main endp
As can be seen in this solution, GCC has attempted to try and save a 64 bit number by using the stack to store the upper 32 bits of the number at [ESP+0xC] and the lower 32 bits of the number at [ESP+0x8]. However it only returns the lower 32 bits of the number as EAX is set to the value of [ESP+0x8], which will just contain the lower 32 bits of 0x8888888822223344, aka 0x22223344.

Now for the interesting bit. So what if one sets the return value directly then? Well we get the following compilation warning:
[Warning] overflow in implicit constant conversion [-Woverflow]
Here is the program:
#include <stdio.h>
#include <stdlib.h>
int main(int argc, char *argv[]) {
    return 0x8888888822223344;
}
And here is the corresponding assembly:
; int __cdecl main(int argc, const char **argv, const char **envp)
public _main
_main proc near

argc= dword ptr  8
argv= dword ptr  0Ch
envp= dword ptr  10h

push    ebp
mov     ebp, esp
and     esp, 0FFFFFFF0h
call    ___main
mov     eax, 22223344h
leave
retn
_main endp
Looks like our number got truncated again, but unlike last time no attempt was made to actually try to save the upper 32 bits of the number specified as the return address anywhere. The compiler instead decided to optimize things and just drop the upper 32 bits entirely, thereby only utilizing the lower 32 bits, aka 0x22223344, in its operations.

Finally, lets try Visual Studio 2017 Community. Upon compilation of the first example we get the following warning:
c:\users\*redacted*\consoleapplication2\consoleapplication2.cpp(10): warning C4244: 'return': conversion from '__int64' to 'int', possible loss of data
Looks to be a fairly accurate description of what might happen here :) But lets just check the disassembly to be sure:
; int __cdecl main_0(int argc, const char **argv, const char **envp)
_main_0 proc near

var_D0= byte ptr -0D0h
var_C= dword ptr -0Ch
var_8= dword ptr -8
argc= dword ptr  8
argv= dword ptr  0Ch
envp= dword ptr  10h

push    ebp
mov     ebp, esp
sub     esp, 0D0h
push    ebx
push    esi
push    edi
lea     edi, [ebp+var_D0]
mov     ecx, 34h
mov     eax, 0CCCCCCCCh
rep stosd
mov     [ebp+var_C], 22223344h
mov     [ebp+var_8], 88888888h
mov     eax, [ebp+var_C]
pop     edi
pop     esi
pop     ebx
mov     esp, ebp
pop     ebp
retn
_main_0 endp
Yep looks looks like the error message was correct, the return value is being truncated to just its first 32 bits before being returned to the caller.

Practical Reverse Engineering - Chapter 1 pg 11 Exercise 1

Problem

"This function uses a combination of SCAS and STOS to do its work. First, explain what is the type of the [EBP+8] and [EBP+C] in line 1 and 8 respectively. Next explain what this snippet does."

Disassembly:

1   mov edi, [ebp+8]
2   mov edx, edi
3   xor eax, eax
4   or ecx, 0FFFFFFFFh
5   repne scasb
6   add ecx, 2
7   neg ecx
8   mov al, [ebp+0xC]
9   mov edi, edx
10  rep stosb
11  mov eax, edx

Explanation:

Line 1: We set EDI to be the value at EBP+8

Line 2: We save the value of EBP+8 to EDX.

Line 3: Clear out EAX, aka set EAX to 0.

Line 4: Set ECX to 0xFFFFFFFF or -1 by OR'ing all of 
        its bytes with 0xFFFFFFFF. As 0x1 OR 0x1 = 1, 
        and 0x1 OR 0x1 = 1, all bits will be set, 
        making it -1.

Line 5: Read value held in EDI, aka the value pointed
        to by EBP+8, and check if it is the same as EAX, 
        or 0. When we look at the REPNE instruction, we
        can see this is essentially a strlen operation 
        as we will keep repeating this operation and 
        decrementing ECX by 1 each time until we hit 
        a NULL byte terminator aka 0.

Line 6: Add 2 to ECX. If we performed the STOSB 
        instruction 8 times, the value in ECX would 
        be -9. Adding 2 to this value will make it -7, 
        aka the negative equivalent of the number of 
        characters in the string before the null byte.

Line 7: Use the NEG ECX instruction to do a 2's compliment
        operation on ECX and in effect flip the sign bit 
        of ECX, transforming it from a negative number to a
        positive one. In our example, ECX would go from -7 to 7.

Line 8: Move byte held at EBP+0xC into AL.

Line 9: Set EDI back to the address pointed to by EBP+8 
        using EDX, where we had saved the original EBP+8 value.

Line 10: For ECX times, aka the number of characters in the 
         string as determined earlier, write the byte 
         contained at EBP+0xC, aka AL, into the string 
         array pointed to by EBP+8, aka EDI.

Line 11: Move EDX, aka the start of the string buffer
         or EBP+8, into EAX so we can return it to 
         the calling function.
So in essence this could be simplified down to the following in C:
int len = strlen(*(EBP+8));
memset(*(EBP+8), (BYTE *)(EBP+0xC), len);
We also can answer the other question as we now know that [EBP+0xC] is a pointer to a byte value to use for the memset operation, and [EBP+8] is a pointer to a NULL terminated string which we want to memset to the value pointed to by [EBP+0xC].

Hope that helps!

-tekwizz123

Monday, January 16, 2017

Lessons from Pentesting #2

Intro

Heyo folks. So on Twitter I asked a number of you what you wanted me to post about, and a number of you said that you'd like to hear what I've learned from working about a year in pentesting. Well, without further do I'm going to try and explain what I think are some of most important lessons I have learned from some of my recent and past jobs. There is a lot to cover so this post might be a little long but hopefully it will help some of you out there when encountering similar situations.

Lessons

Okay we are going to do this on a mixture of anonymised situation based scenarios which I have encountered as well as some general tips as I can't remember every situation :P

Always Relate To The Client

So this is one of the lessons that I had more trouble with but I had some specific scenario with a client that made me realise the importance of this. I was onsite with the client working a particularly disorganized job where things weren't working out and my technical contact was constantly pulling me off the job for various things such as updates on the testing and meetings with various people. This lead to tension between me and my technical contact as I was not particularly happy with being taken off the job to do these various elements and we were not seeing eye to eye with some of the arrangements that were being made to try get the pentest back on track.

Eventually though, I did find a solution that worked. What was it you ask? I looked at the situation from the perspective of the client. I realized that I needed to stop pushing the job from a pentester's perspective and start looking at how I could try help the company from the perspective of my technical point of contact. This is an important lesson and one I still use on my jobs today as it is important to realize that there is a time and place for being stern and pushing the fact that organizations need to get their shit together, organise themselves to be ready for a pentest, and make sure they fix their issues, but there is also a time to understand that there is a lot that goes on in order for an organization to be ready for a pentest and that there may be a lot of things going on behind the scene that you are not fully aware of that may explain why the organization can't patch that high risk issue you reported or get those credentials that you need to test the web API.

Therefore realize that everyone you work with is just another human trying to do their job. Once you realize that, you'll realize that even managers are just another person you need to relate to, albeit at a different level than an engineer which you might have to relate to on a more technical level. Get to understand the person, their problems, and think about how you can work to solve those problems, and you'll not only help to solve their problems, but you'll likely solve your problems in the process and will speed up your pentest in the process.

Realize That Not Everyone Has the Mindset for Pentesting

So this is more of something that I have noticed from watching people who have left pentesting as a whole, but I would like to point out that some people join pentesting but just don't have the right mindset for it. Now I may be wrong about this to some extent and I could look back on this and ask myself why the hell I wrote it but I have noticed some people who have joined pentesting recently who have no real self-seeking passion for knowledge and that intrinsic passion to learn more and experiment with things to figure out how to really solve the issue.

The problem with this is that your not always going to be able to ask people for help when your on site on a client site. You may have a website that requires some specific method to interact with it, and without being able to investigate, discover the internal details and craft a solution, your not going to be able to fix the issue. A somewhat better example though is that without having the drive to learn more, your not going to be able to push yourself to learn new technologies and exploitation methodologies that will allow you to provide the best possible solutions to your companies' clients. You are then facing the risk the company seek out more capable pentesters in the process, which leaves you with a situation of job instability if the company doesn't think you are doing as good a job as it expects from its pentesters.

This has lead to some people that I know leaving pentesting and going into software development instead; if I am being completely honest, I am really happy that they did. They were clearly more driven by the programming side of pentesting and did not always have the skills needed to deal with variety of customer situations that a pentester inevitably encounters. They did however know how to craft programs to solve a variety of problems, had good knowledge of programming and associated programs, and had the drive to create solutions to common problems they encountered, all things that are well suited for a programming job.

So, yeah that was a bit long winded, but essentially realize that you may end up working with people who are quite simply just not suited to pentesting. You're just going to have to deal with it and try and help them as much as you reasonably can, and hope that for their own sake they may find something that better suits their available skills and makes them happy, as you are not responsible for their decisions in life and ultimately they must make their own decisions regarding their job.

Your Going to Live in Hotels

One thing that I think people don't fully realize is just how much time you may end up spending away from home, family, etc as a consultant. Being a consultant isn't just a 9 to 5 (or in our case 5:30) job. It will require you to travel down to the client on the weekend, work after normal hours to understand that job that you have coming up, or edit the report for a previous client.

In fact this was actually one of things that I have seen several people complain about when they start working as a full time consultant. My response honestly? Get used to it. We have people in our office that I rarely if ever see. Why? Well some of them are just working from home as its too expensive to come into the office, but a fair number of them are onsite working for a client, and spend most of their month traveling between various client sites for associated onsite jobs. Its not uncommon to be fully booked for the month on onsite jobs with no associated "white days" (aka free days where you can catch up on work, do research, or whatever you like within reasonable limitations) for that month.

As a consultant you are expected to be able to travel to jobs as and when clients ask for you. That job could be up in Scottland, it could be way down South on the coast, it could be easily accessible by train, it could be a long car drive away, it all depends. You need to be ready to go anywhere, and adjust your travel and hotel plans to suit situations that may come up (prime example: train strikes, all the 3 star hotels being booked leaving you with only a local 2 star hotel to stay in (happened to me twice)). 

So yeah, if your not ready to be flexible on a daily basis, pentesting may not be for you.

Be Prepared for Things to Go Wrong, and Realize Its Not Always Your Fault

I literally can't tell you about the number jobs where things have gone wrong. From missing credentials, to the client updating the site in the middle of testing, to missing authorization forms, to credentials being incorrect, to documentation not being supplied, there are many things that can go wrong in a pentest. Sometimes you may even feel that you caused all of this to happen and it can be overwhelming at times thinking that you might have forgotten something that you think caused all of this to happen.

The best way to deal with these sorts of situations I find is to expect that you may have to spend a day or a few hours on the first day dealing with issues and trying to get things sorted out, especially if its an onsite job (I find remote jobs typically tend to go quite smoothly minus potential access issues as there is less for the client to deal with in most cases). Be prepared to take an active part in trying to help the client out as it is likely that they may not fully understand what you need to conduct your test so you will have to explain it to them keeping in mind they may not be technical.

Also realize that most times when something goes horribly wrong its not entirely your fault. Sure, there may be some situations where you really did mess everything up, but 95% of the time, its either going to be both the client's and you or your company's fault. This may be because the job was not scoped correctly, because the client didn't supply appropriate details, because there was a lack of understanding of the technology, or any number other reasons. All you can do is try do your best to solve the situations you are responsible for and realize that you are not responsible for everything, and there are things that are beyond your control.


Ask Questions to Colleagues But Only If You Can't Find The Answer Yourself

Whenever you are pentesting, one of the most important things to realize is that your colleagues are around to help you. If you are seriously stuck or need advice about something, send them an email or walk up to them and ask them your question(s). Even managing pentesters still have questions about their job; everyone is still constantly learning and we all need to ask each other for help from time to time.

Do be careful though, as you can fall into a trap of asking questions too often instead of looking things up yourself, and you can end up just bothering fellow colleagues (something that I personally am trying to improve on). Therefore always make sure you have a concrete question you want to ask and that you have tried to look up the answer beforehand. This will prevent you asking questions that are a simple Google or internal website/wiki/documentation/etc lookup away from an answer.

Conclusion

Hopefully that helps some people who are starting out in pentesting. I may expand this more in the future, but this is what I was able to come up with in one night from my recollection of past events and jobs within the last year that stood out to me as being prominent in shaping my day to day activities pentesting or which taught me an important lesson.

Let me know if there are any lessons from your pentests you have learned - I would be interested to hear other people's experiences.

-tekwizz123

Saturday, June 11, 2016

Solving Crackmes: A Beginner's Guide Using LuCiFeR's Crackme 2 and Hopper Disassembler

Intro

So as some of you guys may know, I now work for NCC Group as a Security Consultant doing web and infrastructure pentesting. This normally means that I don't tend to do very much security work outside of that. Lately however, I have gotten the oppertunity to do some more research, specifically with reverse engineering. One afternoon I wanted to do something interesting, and remembered about the idea of crackme's, or small programs that people create to be reverse engineered.

Crackme's usually have some sort of goal in mind. For example, they may ask you to find a working serial for the program, or to remove an annoying popup that appears every time the program starts. Additionally they may have some restrictions on a proper solution. For example they may also state that you can't patch the program's assembly so that it jumps over the function that displays the nag screen and that instead you must find another way to solve the problem.

After looking around at a few crackme's I eventually found one that I thought would be a good, very easy challenge to start off with: LuCiFeR's Crackme #2. You can find the file at http://crackmes.de/users/lucifer/first_c_crackme/. Alternatively, you can download it here if you don't want to sign up for an account at crackmes.de: https://drive.google.com/file/d/0B5pT4hU_yYUWeXFvS2RLeDhoTWc/view


Tools Used

To solve this crackme, I originally used OllyDBG and BinaryNinja. That being said however, BinaryNinja is currently in beta and after testing it for a while I found I really don't like it's limitations, such as not being able to search for cross references to a string. Because of that, for this tutorial I will be using Hopper Disassembler. You can use the demo version or the paid version for this tutorial, though I will be using the paid version as I have a personal license. To download Hopper Disassembler, simply visit  as well if you want, which is available from http://hopperapp.com/download.html.

Keep in mind the demo version of the application has a 30 minute limitation on sessions and you cannot save your session. This is similar to the free version of IDA Pro with the exception that with IDA Pro's free version does not limit the session's length. If you don't want to pay the £70 for the full version of Hopper and you want longer sessions, but don't mind not being able to save your work, then you can also do this in IDA Pro's free version.


Initial Analysis

To begin our analysis of the crackme, lets first read what the readme.txt file contains:
  • Rules:
  • 1. Do not Patch
  • 2. Sniff a serial for your name
  • 3. write a keygen
Okay, so looks like this is a serial crackme where we have to find the serial to make the program work. Additionally we have also been told that we cannot patch the program to disable any checks, and that we need to write a keygen. For those of you that are not aware, a keygen is a small program, written in whatever language you fancy, that will take in some input, such as a name, or some other input, and generate the correct corresponding output, such as a serial, for a given crackme.

With that in mind, lets run the crackme and see what we have:


Okay so we have a few things to note here. The first thing is that the program displays a menu. We should note this down as we may want to look through the program's strings in a disassembler and see if we can find any cross references to these strings in memory. This will then allow us to determine the corresponding function that prints the program's menu, which will help us start to analyse the program's execution flow.

The other thing to note is that the program seems to be taking in a name and a serial as input. Based on the fact that the error message that is returned says that we have not entered the correct serial, it seems reasonable to make a guess that the program could be taking in the name as input into some sort of serial generation function. The serial that the user enters is then checked against the output from this function, and if the serials do not match, the program displays an error message and terminates.

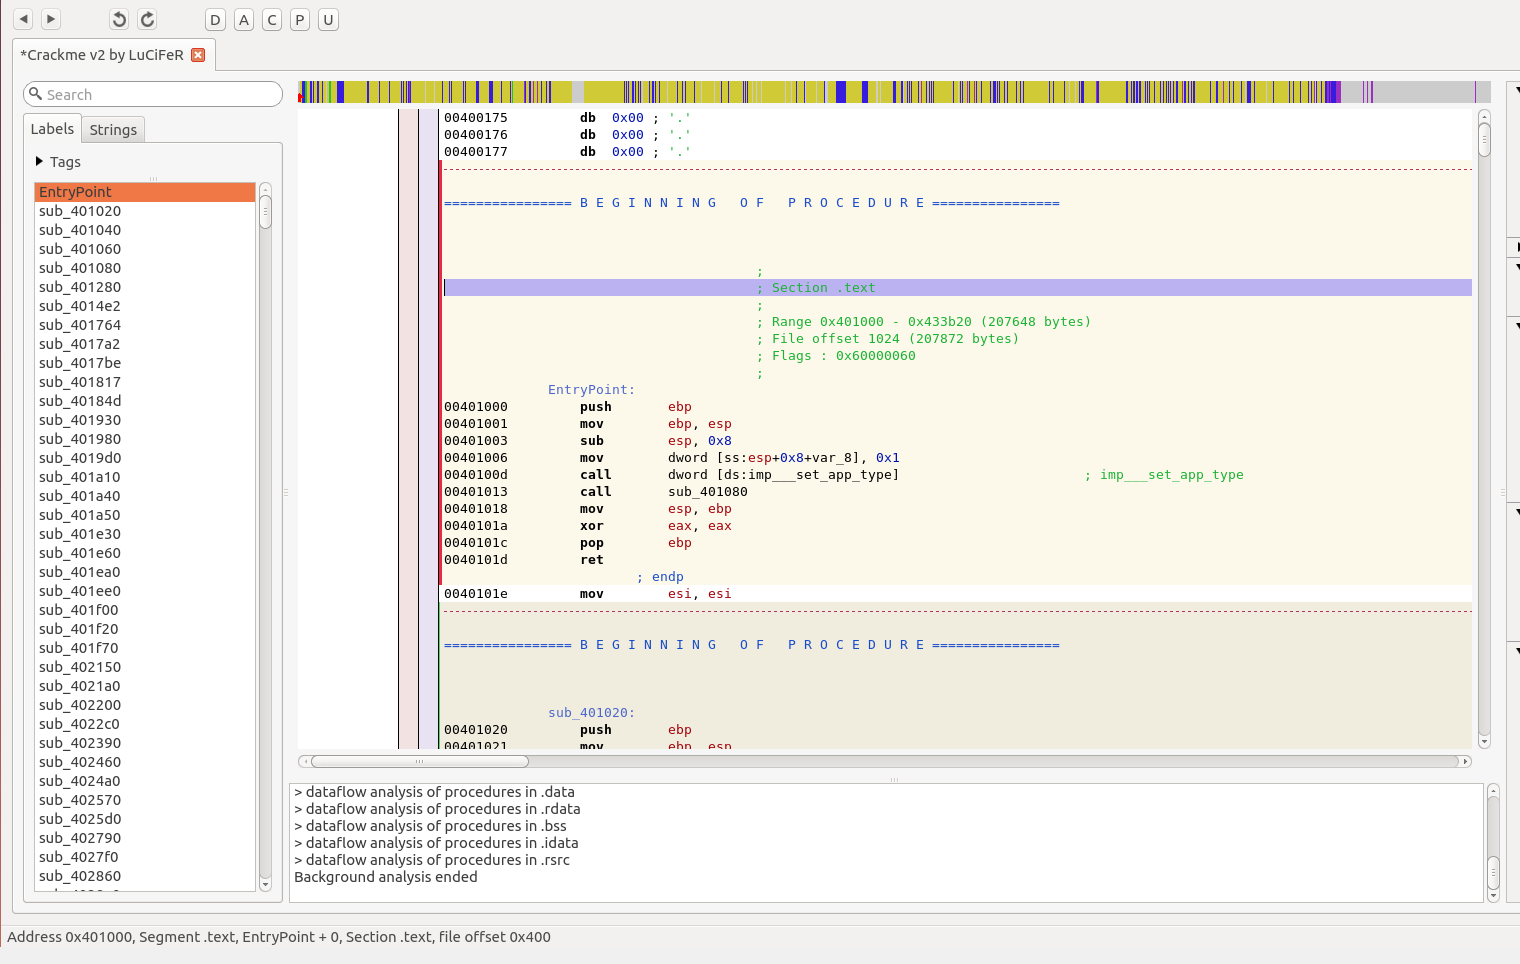
Now that we have done an initial analysis of the program and it's functionality, lets load it up into Hopper and examine it. Drag the executable into Hopper and accept the defaults to load it as a Windows PE file. Once Hopper has finished it's analysis, you should see something like the following:
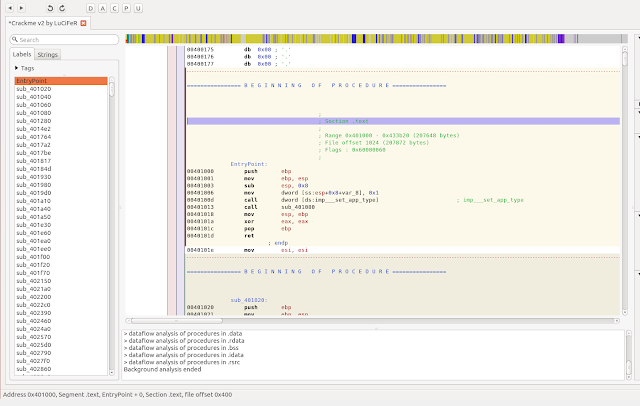
 

You may not be able to see it above, but Hopper has dumped us at the program's entry point, which it has helpfully denoted as the function EntryPoint. On the left we can see a whole bunch of functions, however none of them seem to have any helpful names.

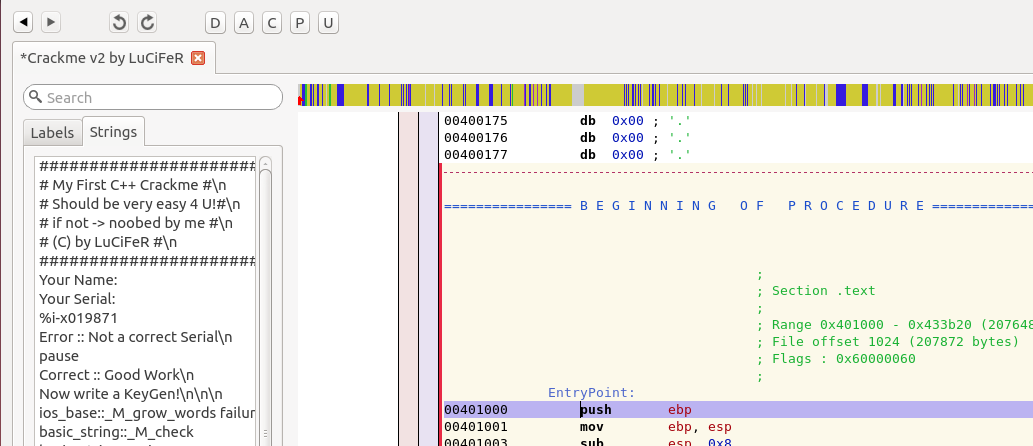
There's a few ways to solve this issue, but the way I like to do it is by looking at the program's strings. To do this, click on the button on the upper left next to the Labels button labeled Strings:
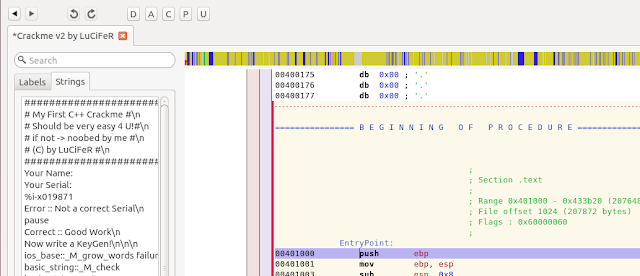
 

Hey, would you look at that! There's several strings which appear to be from the program's menu. Lets see if we can find which function they are being used in. To do this, first double click on one of the strings that were printed within the menu. You should see something like the following:


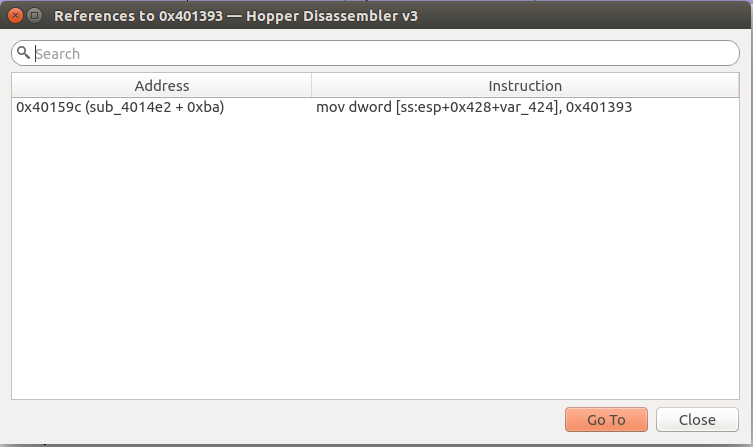
If you look to the left here, you can see hopper has helpfully provided several XREFs for each of the strings to let us know where they are being used. As you can see in the screenshot above, it seems like function sub_4014e2 is using all of these strings. Lets see if we can't examine this further. To examine the cross references for a particular string, single click on the string from the listing shown above (any one will do :) ), and then hit the x button on your keyboard:


Ok, now in addition to the location of the cross reference, we can also see the specific instruction that references the particular string we chose to examine. To go to the corresponding function, simply hit the Go To button. This should give us the following:


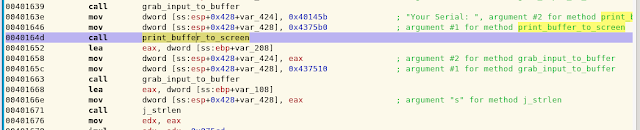
Looking at the assembly, we can see there are several strings which appear to be loaded into the variables var_424 and var_428 before the function sub_431fe0 is called, presumably to print the string out to the screen. Lets rename these variables and the function to make it easier to read the disassembly.

For starters, lets rename sub_431fe0 to print_buffer_to_screen. To do this, click on the function sub_431fe0 within the disassembly, then hit the n button to rename the function:


If we look at sub_432880, we notice that it seems to be being called every time that the program expects input. We can assume that this function grabs the user's input and saves it to a buffer, so lets rename this function to grab_input_into_buffer. When we are done we should get something like the following:


The next thing we want to do is analyse what is being done with our input. To do this we need to focus on the calls to grab_input_into_buffer. Lets take a look at them:
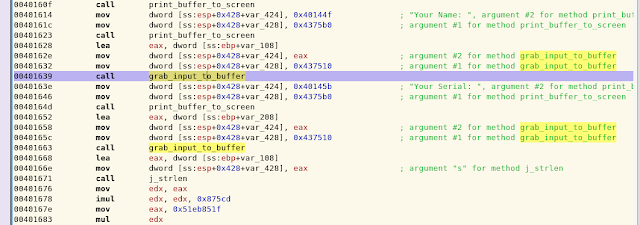
 

What we can see here is that EAX appears to be loaded with the location of a variable in memory (this is done via the LEA instruction). In the first call, this is var_108, whilst in the second call this is var_208. This address is then placed into var_424, which appears to serve as a pointer to the buffer in memory where our input should be stored. Following this we see that for both calls, var_428 is passed the parameter 0x437510 prior to the call to grab_input_to_buffer. Combining this all together and using Hopper's helpful comments in green on the side, we can determine that var_428 is the first argument to grab_input_to_buffer, which contains the stream number to grab the user's input from. The second parameter is var_424, which contains a pointer to the buffer in memory where the user's input is to be stored. This allows grab_input_to_buffer to effectively grab the user's input and store it in memory.

Finally, if we look just after the second call to grab_input_to_buffer, we can see a call to j_strlen along with the parameter EAX, which appears to be loaded with the address of var_108, or the buffer where our name was stored earlier. Lets see what the program does once it has calculated the length of the name that we inputted into the program:


First, the program loads the result of the strlen call from EAX into EDX at 0x00401676. We then go ahead and multiply EDX by 0x875cd, storing the result in EDX (the first parameter to IMUL is where to store the result, the second one is what to multiply 0x875cd by :)  ). Once that is done, we move 0x51eb851f to EAX, and then execute mul edx.

What is important to note at this point is that the mul instruction multiplies EAX by the parameter provided and stores the result in EDX:EAX. That is, the higher 32 bits of the result are stored in EDX, whilst the lower 32 bits of the result are stored in EAX.

With this in mind, the next instruction, MOV EAX, EDX stores the higher 32 bits of the result into EAX. The instruction SHR EAX, 0x5 then shifts EAX right 5, which is equivalent to dividing by 2 ^ 5, or 32.

Once this is done we multiply the result by 0xfffffc90 and store it in EAX. Keep in mind that any result over 32 bits will be dropped at this point. In other words if we end up getting a 42 bit number as the result of the multiplication, the first 10 bits would be dropped and only the last 32 bits would be saved in EAX.

Next we move 0x0 into EDX and push the values of EDX and EAX onto the stack. I do not know why this occurs as it does not impact anything and the values are not POP'd off the stack at any point.

Following this, the instructions at 0x00401697 to 0x004016aa do some instructions with floating point numbers. We'll get into this with OllyDBG in a bit but for now just now that there is a seperate stack which is used for floating point numbers and these instructions use that stack to adjust our calculated serial somewhat.

If we look at 0x004016ae to 0x004016bf we can see that we load the string "%i-x019871" into var_42C and the address of var_308 into var_430. These are then used as the first and second arguments respectively for the call to j_sprintf, which seems to save the serial that we should have entered into var_308.

Finally, we have a call to j_strcmp which compares two pointers to string buffers to see if their contents are the same or not. The first argument points to var_208, which holds the serial that we entered into the program. The second argument points to var_308, which holds the serial that we should have entered. The program then jumps to a goodboy or badboy message according to whether or not these two buffers matched or not.


Initial Overview of Crackme Algorithum

At this point we can determine the algorithum works as follows:
  1. The program calculates the length of the user's name.
  2. This is then multiplied by 0x875cd.
  3. The result of this operation is then multiplied by 0x51eb851f and the higher 32 bits of the result are saved.
  4. Bit-shift this number right 5 bits, effectively dividing by 32.
  5. Multiply this value by 0xfffffc90
To figure out the final part of the algorithum (so we can generate a working solution) we need to turn to OllyDBG.


Using OllyDBG to Solve the Floating Point Instructions Issue

With a understanding of most of the crackme's algorithum, we now turn to OllyDBG to understand the floating point instructions and how they change the final serial that is generated.

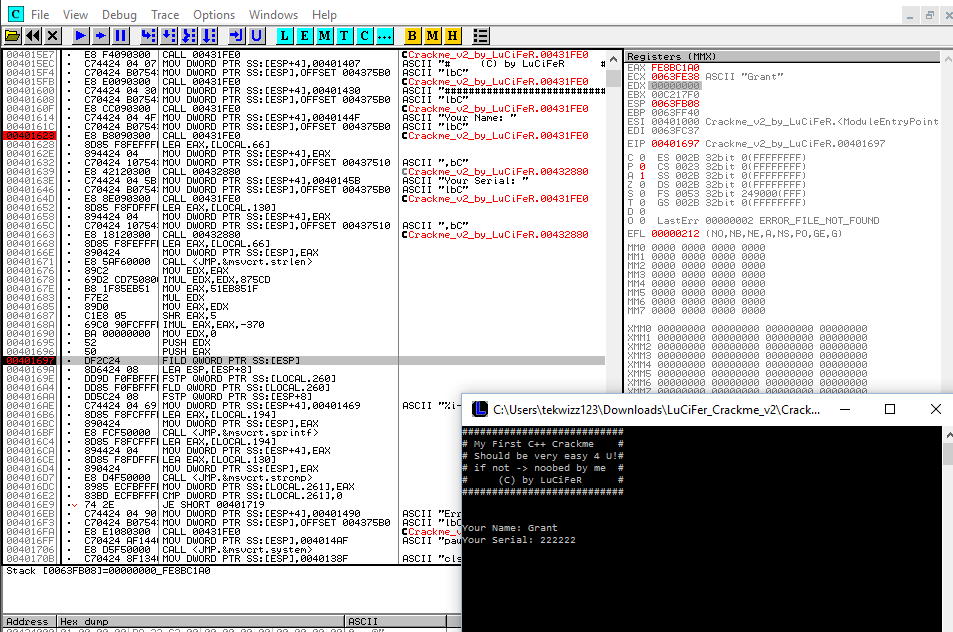
To speed things up a bit, first set a breakpoint at the address 0x00401623, which is hit after the first part of the menu is printed out. If we scroll down we should see the same disassembly as in Hopper, with the first floating point instruction occuring at 0x00401697 after the PUSH EDX and PUSH EAX instructions. Let's put a breakpoint here so we can examine things further, and press F9 to continue the program. We enter in our name, and our serial, pressing F9 to continue the program as needed before eventually we hit the breakpoint:
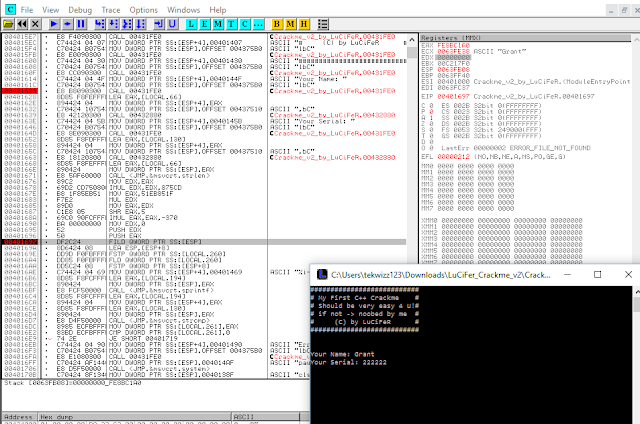
 

The next instruction, FILD QWORD PTR SS:[ESP] loads a QWORD, or a 64 bit number, from the location pointed at by ESP, and puts it onto the FPU (Floating Point Unit) stack. This can be seen in the following screenshot. Notice that ESP holds the value 0xFE8BC1A0 while ESP+4 holds the value 0x00000000. As we are reading a 64 bit value into the FPU stack, we read both of these values (a 32 bit, or DWORD read would just read the value at ESP, 16 bit, or WORD read, the SP register, etc etc):


An important point to note here is that the value 0xFE8BC1A0 is the value calculated from the first 5 steps of the algorithum that we have examined so far. Moving on though, we can see that the MM7 register of the FPU stack has now been changed to hold the value 0x000000000FE8BC1A.

The next instruction, LEA ESP, [ESP+8] loads the address of ESP+8, which holds the name that I entered into the program (in this case "Grant"), into ESP. This effectively moves the stack pointer so that it now points at our name on the stack.

The instruction FSTP QWORD PTR SS:[LOCAL.260] pops the QWORD value 0x000000000FE8BC1A off of the FPU stack and writes it to the local variable LOCAL.260. If we look closer at the information provided by OllyDBG, we can see that LOCAL.260 is the address 0x0063FB30. Following this in the dump (right click on the address in the information display and click Follow in Dump) shows that the memory is currently empty:


We can also see that OllyDBG tells us that the float value 4270571936.0000000000 will be written into memory at this address. Pressing F7 to do a single step in OllyDBG, we can see that the memory has been adjusted, though not quite in the way we expected:


Whats happened here? Well, this took me a bit of research and I had to look at some previous answers to understand what happened here, but apparently the FSTP instruction, when converting the number 0x000000000FE8BC1A to floating point number, or 4270571936.0, also packed the number into binary format before storing it in memory. Reversing the bytes, this means that the number is now stored as 0x41EFD17834000000 at 0x0063FB30 in memory.

The next two instructions FLD QWORD PTR SS:[LOCAL.260] and FSTP QWORD PTR SS:[ESP+8] first load the value of LOCAL.260, which is now 0x41EFD17834000000, onto the FPU stack, and then POP that value off of the FPU stack and write it to ESP+8.

MOV DWORD PTR SS:[ESP+4],00401469 moves the string "%i-x019871" into ESP+4, and the following two instructions LEA EAX,[LOCAL.194] and MOV DWORD PTR SS:[ESP],EAX load the address of LOCAL.194 into EAX and push it as the first argument. We then see a call to sprintf with these three parameters. From this we can conclude that we are sprinting the resulting serial into memory at LOCAL.194, and that the string "%i-x019871" is the format string to print into memory, whilst LOCAL.260 is the value that will replace the "%i" part of the format string before it is placed into memory.


Final Crackme Algorithum

From this, we now have our crackme algorithum. We also know that the generated number is appended with the string "-x019871". Our new algorithum now looks as follows:
  1. Calculates the length of the user's name.
  2. Multiply this number by 0x875cd.
  3. Take the result of this operation, multiply it by 0x51eb851f and take the higher 32 bits of the result.
  4. Bit-shift this number right 5 bits, effectively dividing by 32.
  5. Multiply the resulting value by 0xfffffc90, and store only the lower 32 bits as the result.
  6. Take this value in hex and convert it to a floating point decimal number, then pack the result in binary format.
  7. Convert the number back to an integer, and append the string "-x019871" to it.

The Keygen

The last part of the challenge asked one to generate a keygen for the program. This is a small program which takes the algorithum mentioned above and generates a serial based on the name entered. I will leave this as an exercise for you to complete, however if you would like to see my poorly annotated, hacky solution, you can find it here: https://drive.google.com/file/d/0B5pT4hU_yYUWMnBfVTllaHNrMWc/view?usp=sharing

Conclusion

I hope you enjoyed this tutorial and it inspired you to get into crackmes more :) I appologise if it was overly detailed in places but I wanted to make as many people could follow along as possible. Let me know if you have any comments or feedback!

-tekwizz123


Saturday, February 20, 2016

An Update and Some Tips and Tricks I Picked Up

Intro

Quick note before I start this, but I am writing this at 12:36 am my time so please excuse any spelling mistakes etc you may find :)

Some Lessons

Its been a long time since I've last done a post on this blog and I think enough has changed in my life that I aught to discuss some of the things that have occured. For those of you not already aware, since I last updated by blog I finished my studies as a Junior Security Consultant at NCC Group and have now graduated to a full time security consultant. As a result of this I've been busy bouncing back and forth between various jobs for several of NCC Group's clients, an experience that has proven to be both interesting and unexpected in a number of different ways.

In particular, one of the things that suprised me the most was how different everyone's experience is when it comes to performing professional pentration tests. Whilst my internship at MWR Infosecurity exposed me to this somewhat, its become much more apparent over the last few months that there are a wide range of skillsets within the infosec industry and that it really is quite impossible to master every single one of them, or even truely gain indepth knowledge of a few of them, without actual experience working with those products. There is simply too much to learn within a single field of security. As thus I've found that many people tend to choose one main area of study that they want to truely master and then another 2 or 3 additional areas that they try to remain knowledgeable about. This is just my experience though an in no way should act as a delimter to stop someone from trying to learn as many feilds as they feel comfortable taking on.

Another thing that I've come to realise more about is the role of certifications these days. Many people I've met have repeatly noted that they are not comfortable with the idea of certifications within the security community, and having done some jobs for NCC Group, I can honestly say that I understand why this is the case. Whilst I have done several security certifications such as OSCP and OSCE in the past, and they have no doubt help build the basics in my mind, until you are actually put on the job and have to learn things by yourself. Several concepts, tips, and tricks I've only learnt through actually getting hands on with training labs and real world client engagements where one has to come up with solutions to various problems on the fly. While most of you who probably read this blog already know this is the case, you'd be suprise to know that some of the people I've worked with still don't realise the crucial need to self learn or ask for help in these situations. If you don't know how to Google your problem, your going to have a bad time and your just wasting your time, your clients time, and the companies time.

Finally, I  found it really odd how many pentesters I've met from various companies whilst working who don't know how to program. Understandably, some pentesters may feel that they don't need to learn programming as most of their job consists of running tools that others have programmed and then interpreting the output to report to the client. Unfortunetly, without a proper understanding of programming, one will not understand the true underlying nature of a lot of security issues that he/she reports, which will hamper one's ability to explain the true impact of a bug on the client's systems.

Future Plans - Defcon, Exploit Development Stuff, Misfortune Cookie, etc

With all this aside, I wanted to say that this year I will be planning to attend Defcon 24 this year and will be self funding a trip down to Las Vegas to come see all you guys in the USA :) If your in the area or planning to attend, feel free to give me a shout; it would be great to meet up with all of you!

Some of you guys have also been asking why I haven't been updating the blog with any stuff reguarding exploit development. The thing is that while I am still working on exploit development from time to time (its not so easy doing it inbetween jobs), a lot of it is still either a work in progress, or covered by company NDA agreements, so I can't really discuss a lot of it. That being said, if you are interested in some of the work that I have done recently, feel free to take a look at https://www.nccgroup.trust/globalassets/our-research/uk/whitepapers/2015/10/porting-the-misfortune-cookie-exploit-whitepaperpdf/ for one of my whitepapers I did on porting the Misfortune Cookie exploit to support more target routers. Unfortunetly due to the company's policy on exploits, I am prohibited from releasing any of these exploits publicly or too many screenshots on the whole process, however the whitepaper tries to provide an overview of the process and the problems that I encountered as best as I could.

I've actually had a lot of thoughts about how I plan to continue to develop my skills in the future. One of my concerns is the combination of pentesting and exploit development burning me out in the long haul, however at the same time I realise theres a certain point where this thought is just dragging me down and preventing me from doing anything useful. To that extent I am planning to try go through The C Programming Language 2nd Edition by Brian W. Kernighan and the late Dennis M.Ritche to recover C programming basics and ensure that I don't have any gaps in my knowledge as I feel there are some areas that might need reinforcing. I'm hoping to then go through The Shellcoder's Handbook Second Edition as I really need to go through some of the basics in that book such as heap overflows, fuzzing and format string bugs.

Conclusion

With all that being said, I'm very happy to be working with NCC Group at the moment and I hope to try and update this blog some more in the foreseeable future if it is at all possible, however the main thing I wanted to get across here is that because of NDA's and work life, I may end up posting less on this blog than normal. Hopefully though, I will be publishing some whitepapers and technical articles though NCC Group and I'll likely be notifying you guys of any updates on that side of things through my blog or Twitter.

Until the next update, keep learning guys :)

- Grant

Wednesday, November 11, 2015

Some Observations On Duo Security's "WoW64 and So Can You" Paper

So presently I haven't been posting a lot due to ongoing work at NCC Group but I stumbled across something interesting I thought would be good for a quick post whilst reading Duo Security's "WoW64 and So Can You" paper. In the paper, they describe how many of EMET's protections, whilst properly applied in pure 32 and 64 bit contexts (with the limitation that a few ROP mitigations don't work so well on 64 bit programs if I recall correctly, though this may have been fixed since then), are not applied well or even at all within WoW64 contexts. As described very nicely within their paper (which I am just briefly sumarizing here for simplicity and convience's sake) WoW64 is essentially a compatability layer for 64 bit operating systems to run pure 32 bit applications within their 64 bit environment.

The real problem for EMET is that the way this is implemented is essentially to have two contexts running for the application at the same time, one to support 32 bit (aka protected mode) operations and one to support 64 bit (aka long mode) operations. When I say two contexts I really do mean two contexts here. There are sepearte TEBs (thread execution block, which handles the threads for the program), PEBs (process execution block, which contains data structures which apply for the entire process), and a number of different DLL imports and redirects which all help to ensure that the application is able to run on the 64 bit operating system.

The problem that occurs here when one considers that an application can switch between 32 bit and 64 bit modes during execution with a single instruction. At this point it becomes very hard for EMET to properly enforce it's protections as whilst it may intially implement it's function hooks, hardware breakpoints and other protection mechanisms under the assumption that the application is running as 32 bit code, as soon as the application switches to 64 bit mode, these protections are essentially rendered useless as now different code, libraries, and execution environments are being used which are no longer subject to the protections implemented on the 32 bit code. To add further complications to the matter, even if these protections where to somehow be brought over from the 32 bit code, one has to reimplement them in 64 bit code to match the new execution environment, otherwise they would not function correctly.

What I found particularly interesting was in their"Address Space Layout Section" where they described how they attempted to find where the 64 bit copy of ntdll.dll that was loaded into the WoW64 process is located so they can start calling functions from it within their shellcode. In particular I found particular interest in their second point, which I'll quote here:
The order in which modules are loaded is reliable, resulting in predictable module alignment presuming no change in module size (in practice, we have found this alignment to be reliable across a variety of patch levels).(https://www.duosecurity.com/static/pdf/WoW64-Bypassing-EMET.pdf)
You may recall my post An Theoretical Approach to Getting Around EMET's EAF Protection in which I described a way to potentially get around EMET's EAF protection in a similar manner. By looking up a function with the export table which is located in the same DLL as the function we wish to call, we were able to obtain a base address from which to start our calculations. From there we abused the fact that functions within a DLL tend to be located at set offsets from one another to find the location of the function we wished to call by taking the address of the function that we had located from the export table and adding or subtracing the offset to get the address where our desired function had been loaded in memory. I did also note after some comments from Reddit that the exact offset may change across patch levels due to the fact that the size of different functions within the DLLs may change, thus affecting the exact size of the offsets between functions.

In a similar manner, Duo Security managed to abuse the fact that the order in which the DLL's are loaded into a WoW64 process on Windows 7 are always located at set offsets from one another, assuming no change in module size. That sounds rather familar right? They even mention how changes in module (aka DLL) size and patch versions will mess up their technique. So it seems to be rather similar to the technique that I ended up using in my research paper.

I just wanted to point this out in case anyone was interested and also to bring up another point to think about when considering EMET bypasses, namely that whilst ASLR does have a large impact by preventing an attacker from learning the location where modules are loaded in memory, there are still ways, in the right environment, by which one can figure out their location without resorting to memory leaks or other exploits.

Will be interesting to see if anyone takes Duo Security's research and applies it to some real world public exploits as I would be interested to see how such techniques handle themselves when confronted with different vulnerable targets and exploit scenarios.

Until next time,
Grant (aka @tekwizz123)

Wednesday, July 1, 2015

Final Year Dissertation Paper Release: An Evaluation of the Effectiveness of EMET 5.1

Update (July 26th, 2015 4:00pm): So looks like I've finally got an answer reguarding this issue. A representative from the Export Control Organisation responded back saying that, as some of you have pointed out, by releasing my research publicly I would not be subject to the terms of the arrangement due to the public domain exception clause. Futhermore, they also do not consider exploits or intrustion software itself to be controlled by the new 'intrusion software' related controls for export from the UK or EU. Therefore it looks like I should be clear to release the full report to the public. I have attached a screenshot of the email below as proof of evidence and so you can read the details and full and make your own interpretation in case I have misread anything:


Update (July 20th, 2015 7:20 pm): Sorry for the delay reguarding this issue. I have recieved another update from the Department for Buisness, Innovation and Skills reguarding my questions. They have apparently decided to forward my question on to the Export Control Organisation who deal with export licenses and any conflict with the Wassenaar Arrangement. The email was sent on July 17th, as you can see below. I will await a response.

 
Update (July 15th, 2015 2:04 pm): So I have recieved an update from the HMRC government reguarding what they think about this issue as well as a minor update from my university. Starting with the university (since that is simpler), they are still working on getting things organised but are looking to try push the issue past the ethics board after I have stated my case as to why I believe the exploits, and subsequentally the whole research, should be published in full.

You can see the email response that I got from the uni below. For reference Julie Horton is the head of all of the final year dissertation projects at Northumbria University and also acts as a mediator of sorts to ensure that projects fall within the university's ethical guidelines. Martin Wonders, who you may see cc in the email above this one, was my project supervisor:


With that being said and done, I have recieved a final answer from HMRC. Unfortunetly despite my persistance reguarding the matter and repeated questioning of whether or not the paper was within the export restrictions guidelines, all I got as an answer was "look at the export guidelines". Here is the full chat log that I had with HMRC for reference:


In summary, the gist of the email is that the HMRC (who are one of two bodies responsible for enforcing export controls over here) referred me to the Department for Buisness, Innovation and Skills reguarding my original export question, at which point they have then repeatively told me that I need to align my research with reguards to the export control lists without stating whether or not my research actually falls within the tolerances of the export control lists or not.

Therefore at the moment, until I get a response back from my uni I can't really do anything. I've heard a lot of people state that the research should be ok to release publicly and provided the export controls in the UK are indeed in line with what I think they are it shouldn't be an issue but still working on getting the university side of things sorted out. Hopefully this will all become clear sometime soon.

Update (July 5th, 2015 23:47 pm): In light of the attention this post and the associated paper has been getting I would like to discuss my current plan of action. Many of you have said that I should just release the code publicly and get it over and done with. Whilst I would like to do this, I do not believe this to be the best of course of action. 

Instead I have decided to talk to my supervisor and the uni's ethics board again to see what can be done about releasing the code. As far as I am aware (this is from my main project supervisor) it should be possible to get the uni's ethics board to review and possibly change their decision to allow the code to be released but obviously this will take time.

The other thing that I have done is contacted the HMRC, one of the enforcing boards of the Wassenaar Arrangement here in the UK, to get their official opinion on this situation. I believe this is necessary to prevent such situations from happening in the future and at least get the UK government's opinion on such matters, which will hopefully help others who wish to release similar research in the future.

Please be patient with me whilst I continue with this process. I know you guys think I'm being naive/silly/w.e but at the end of the day this is my decision and this is what I believe is the best course of action for all involved.


This post has been in the works for a long time, however I wasn't able to release it until my official results came out due to concern about collusion which could have resulted in my university changing the results of my grade. However now that the grades have been published and results are final, I can share with you guys something I have been meaning to share for quite a while: my final year dissertation paper.

My paper covers three separate exploits that I converted to try bypass EMET 5.1's protections as best I could and the techniques that I used to do so as well as how successful EMET 5.1 was at preventing me from exploiting the vulnerable programs.

Before proceeding, please note a couple of very important points:

Update (July 26, 2015): Paper has now been released in full.
  • I am aware there are a few conceptual issues the approach I used for this paper. In particular, the technique that I used to bypass EAF and locate the functions needed to create the final exploit does not work consistently across different patch versions of the same operating system (aka a clean, unpatched version of Windows 7 will need different offsets than a fully patched version of Windows 7). Whilst further research did find that only a very limited number of core kernel updates affect this issue, it still is a huge limitation and is something that I would look to fix if I had more time in the future.
  • There may still be spelling or grammatical issues within this document, for which I apologise in advance. I have looked through the paper several times so most issues should be resolved but please let me know if you find anything.
  • There are a couple of sections within the paper that were purely for the uni. Please feel free to skip these as they are not relevant to the paper's content :)

With all that being said, please do enjoy the paper :) I hope you manage to learn something from it.

Download (full, uncensored version): https://drive.google.com/file/d/0B5pT4hU_yYUWLXVZVTlBa05La1E/view?usp=sharing

Download (old censored version):  https://drive.google.com/file/d/0B5pT4hU_yYUWcUtsUWxxcFJjOVU/view?usp=sharing